Showing posts with label photographing children. Show all posts

Thursday, August 16, 2012

Shooting Sharp - Tips to Get Tack Sharp Shots

Today I thought I'd share some simple tips for getting sharp focus. In photography circles there is always a lot of buzz about getting tack sharp images. As a newbie, I was sometimes mystified by how the images I saw online were so crisp and sharp and mine were, well, not. I was awed by those shiny portrait eyes that seemed to pop off my screen. After much reading, googling and practicing, I uncovered some of the secrets of the pros. So, here are a few tips I've learned for getting sharp focus.

1. Use a tripod
Okay, I'll admit that I often skip this one. I'm too lazy to take it out and set it up most of the time. I'm also usually chasing my kids around and tripods are not exactly made for that task. But, if you are shooting a macro shot, landscape or posed portrait it will be a tremendous help! Any little bit of camera shake will effect your focus. Just do it!

2. Use a remote or wireless trigger
These devices remove all chances of shake as you don´t have to touch the camera. You can most likely find a remote compatible with your camera for under $20. I got one on amazon for about 10 bucks. Or, you can use the self timer. This is also a great way to get in some of those photos yourself. You don't want to be the family member missing from every photo in your archives!

3. Check  your shutter speed
Always make sure that your shutter speed is set higher than the focal length of your lens. For example, if you shoot with a 50 mm lens, set your shutter speed at least 1/60 or above. If you shoot with 85 mm lens, set your shutter speed at 1/100 or above, etc. And if you are skipping tip #1 and hand holding your camera, anything below 1/80 will be tough to keep steady.  If you are taking photos of kids, you'll need a faster speed to avoid motion blur. I always try to stay above 1/125 for squirmy subjects. Actually, since I'm lazy about using a tripod, I try to stay above 1/125 most of the time, which brings me to #4.

4. Up that ISO if you need to! 
It is more difficult to achieve tack sharp focus in a low light situation. If you don't have much light to work with, don't be afraid to increase your ISO. Most cameras these days handle higher ISO's pretty well. Get to know what yours can handle with practice. And remember that a properly exposed image will have less noise, even at a higher ISO, than one that has been underexposed and lightened up in post processing.

5. Shoot with a prime 
Prime lenses are known to be faster and sharper. They are generally more pricey but worth every penny in my opinion. The nifty fifty, 50 mm 1.8 is an inexpensive choice that offers speed and sharpness. The 50 1.4 is a little more expensive, but one of my favorite and most used lenses. It's sharp, fast, small, and delivers dreamy bokeh.

6. Check your F-stop
If you increase the number of your f-stop, more things will be in focus as you'll have more depth of field to work with. Shooting wide open not only eaves little room for error, but most lenses aren't as sharp at their widest apertures. If you want super sharp images you are probably better off to stop down a bit to a smaller aperture.

7. Toggle your focus point
Most DSLR cameras have a button to tell the camera how and where to focus. Check your camera's manual if you don't know how to do this. For portraits it is best to focus on the subject closest eye (or between the eyes if they are straight on) for close ups, and on the face for full body shots. If you are shooting a group, choose a subject in the middle of the group (check that your aperture is wide enough to keep the whole group in focus too!).

8. Choose AI Servo or AF-C
Your camera has different settings for how it will focus. Read your manual to get a better understanding of how this works. They are called different things on Canons and Nikons but work pretty much the same way. Most DSLR's have three options here: one for a subject that won't move (single shot or single servo), one for a subject that might move (Al focus) and one for moving objects (Al servo or AF-Continuous).
Most photographers I know (especially those shooting children) choose Al servo or AF-C so that the camera will track focus when the shutter is pressed half way (or the AF-ON button pressed) even if your subject moves

9. Try back button focusing. Most DSLR's have an option for separating your focus from your shutter release. You can designate a button on the back of your camera to control focus, usually the AF-On button. When you press this button it locks focus and then you press your shutter button when you are ready to record the image. It takes a little getting used to, but many photographer's swear by it for sharp images. My advice is to check your manual (or google "how to back button focus" for your camera model) to set it up. Then give it a try for a couple of weeks to see if it's for you. 

10. Sharpen...a little.  After following all of the above tips, you can sharpen in post processing, but easy does it! I like my images (especially portraits) to be pretty natural so I try to avoid over-processing them. But I do sometimes add a little sharpening to the eyes in Lightroom or Photoshop to help them pop. Keep in mind, if your focus is off when you click the shutter, then extra sharpening in post-processing won't fix the image. There are about a bazillion actions out there to add selective sharpening to eyes, brighten irises, and make those catchlights sparkly. But beware of creepy overdone eyes! Too much is definitely a bad thing. 


Remember to keep these tips in mind as you shoot, and you'll be on your way to some snazzy sharp images in no time!


Photobucket

Monday, August 13, 2012

Tips for taking pictures WITH your kids

I often get asked how I am able to take pictures with my boys. Answer: It's actually pretty easy, I just do it.  Now some of you might think that it's just not that easy.  I'm here to tell you that it can be!

My advice is to keep it simple, keep it short and most of all, keep it fun!

Made sure my room looked decent before I had the boys come in.  Then I set the tripod in front of the window so that we were facing the window for the best natural light.

Keep it simple:
- Use your own home where your kids feel most comfortable.
- Set up a tripod and if you are able to, use a remote! (I got mine for $20 off Amazon)
- Have everything ready and set up before you call the kids over to take pictures.
- Don't ask them to do anything crazy that might distract them from the pictures you want to take.

Set up the bottom half of my photo booth and taped pieces of crepe paper to it.  We were facing our big sliding glass door.

Keep it short:
- Kids have short attention spans!  So keep it down to about 10 minutes.
- My boys are at their best in the morning.  If I want to plan pictures, the morning is the best time for us.
- Again, make sure everything is ready before you have them come over for pictures.  If they have to wait for you, they can get bored and that's when the trouble starts.
-If they aren't into it at first you can always stop and try later.
- If all else fails, bribe them!  I'm not going to lie, if I can tell Hudson is not totally into it, I tell him I will give him a piece of candy if he is good.  :)


Keep it fun:
- Use props. I like to use what we have like dress-up clothes and toys.
- Allow them to make funny faces!  It doesn't have to be serious and simple smiles.
- Jump!
- Give your kids adult accessories like hats and glasses.  How cute for them look back at them wearing their daddy's stuff.
- Play some music.
- Play Simon says!  You are guaranteed to get a bunch of silly faces with a bunch of good ones too. Example: Simon says give me a sad face.  Simon says to give me your best smile.
- Have a remote?  Let your kids use it!
- Allow them to come up with a concept for the pictures.  They just might surprise you!


It's so important to take pictures with your kids.  They will seriously appreciate every picture they have with you in it with them.  My goal is to take pictures with my boys once a month.  I take pictures of all of us and with each individually.


So here's a new goal for you: If you haven't taken pictures with your kids in a long time, go do it now!  Try.  You just might ending up having a great time.

Summer
Crosbie Crew

Friday, June 22, 2012

Real. Life. Photography. | Book Launch Party & Giveaway

I was so thrilled and honored that Rebecca asked me to be a part of her book launch party. If you don't know Rebecca, she is the author behind Simple As That. She is seriously talented. I look up to her photography and craftiness.


About Rebecca | A professional photographer and mother of four children, I make my home in Alberta, Canada. I'm the author of two previous photography eBooks, 40 Top Tips for Better Photos and Don't Say Cheese!, both published through Ella Publishing Co., as well as a scrapbooking inspiration book, Real.Life.Scrapbooking., published in 2008.


About Real.Life.Photography I believe strongly in encouraging women to take more photos of everyday moments—it's my absolute favorite part of photography! I started working on this 68-page, professionally designed and edited eBook more than a year ago. I spent months carefully assembling my best tips and tricks, gathering 127 real-life photos, and writing hundreds of useful photography tips. My goal is to inspire women everywhere to pick up their cameras more often and to be happier with the photos they take.
 

Excerpt "Photographing real life isn’t always easy. In fact, it’s a lot harder than taking family portraits in a well-lit studio or outdoors at the perfect time of day. Real life passes quickly. It doesn’t wait for you to pull out your camera. It doesn’t wait for ideal lighting conditions. And it doesn’t wait for your house to be spotless. But I promise that capturing everyday moments is worth the extra effort. Capturing life as it happens helps me see things differently. Boring becomes beautiful. Ordinary becomes extraordinary. Life can get so busy and crowded with distractions that it’s easy to forget what matters most. Pausing to take photos along the way helps me slow down and just enjoy my life exactly as it is." —from Real.Life.Photography.: How to find magic in everyday moments by Rebecca Cooper
I loved everything about this book. It was set up so easy to read and follow. I loved how she shared her settings for every photo and what lens she used. I have really wanted to learn to take more natural photos of my kids doing what they do. This is the perfect book for me. It inspired me in taking these photos with Dustyn. I really hope to do more with them in the future.

If you are looking for an easy to read book with lots of awesome tips check it out. Just like shooting kids in AV mode instead of all manual. It makes perfect sense, but I never thought of it!
She really jammed this full of tips, tricks, and techniques. She even talks a little bit about editing. Christy from Addy Lane created a Simple Fixes Action Set that go perfect with Rebecca's ebook.

Here is an edit of a photo of Carsyn side by side. I didn't do anything else to it besides using the Simple Fixes Action Set.
I used Goodbye Red Skin, Simply Lighten and Simply Boost. I love how easy and fast they were to use. I will be using them in the future.


You can purchase the ebook or the action set for the introductory price of $9.99 each (the regular price will be $12.99).

If you purchase both the book and the actions together, you can take 20% off with the promo code PHOTOFIX. 

You can enter to win a copy of the ebook and the action set below in Rafflecopter.

  a Rafflecopter giveaway


Thanks so much Rebecca for including me in your Book Launch Party. I really enjoyed reading the book and trying out the actions. Product Provided

Tuesday, July 12, 2011

Touch Up Tuesday: Cleaning up dark spots


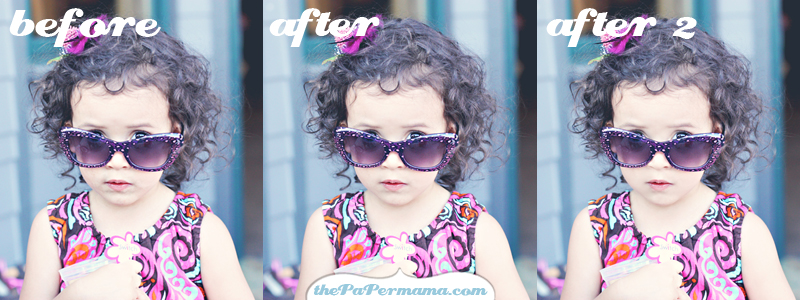
Edit: After I finished editing this photo of Kamilah.... I noticed the darker shadow on her face. I personally prefer to not edit out any shadow completely. I think if you completely get rid of shadow on a face it can make the face look flat and not like what the person looked like before.

What I do: I use my clone tool (my fave tool EVER) and set it's opacity to 14%. I duplicate the photo and edit all the shadow I don't like off of the face... THEN, I adjust that layers opacity to 50%. That's about where I like it. :) In the example above I showed my before, after, and after 2. "After" is where I normally like my edit to be... "After 2" is just a little further than I like. Her face seems too smooth. Happy Tuesday!


Photography love...
 
Link up your Touch Ups below! Linky's always close at 11:59 PM Wednesday evenings (Pacific time).


Friday, March 25, 2011

The Secret to Photographing Children

Ok, Maybe tip would be a better word. Since many of them are obvious, we just seem to forget them in the moment when we are trying to get that perfect photo of a child. If you find you are having trouble catching those moments, I hope this post will help you out. There are several great photography sites out there with all sorts of great tips on photographing children…just google that and you'll find many. Below I have given you my top 6 but there are many more ideas on how to engage a child that's in front of the camera!


No. 1. Be patient. 
Seems obvious, like I said, but it can be so frustrating. Especially when you are trying to capture something specific and they are not buying into it. Being calm and talking to them quietly really is the best way to go. If you're flustered by their actions, they'll know it and you won't get your shot for sure! Sometimes during the time spent trying to get that "perfect" shot, you get something even better. 


No. 2. Learn your camera.
Again obvious. You have to know your camera. Kids are quick and if you have to spend time messing with settings you are going to miss the shot you are looking for. So, know your comfort level, if it's a situation where playing with your camera is not an option and you have to capture it, set it to what you know. Do your test shots before, so you can plan for lighting, etc. The more you play with settings in manual (which I try to use most of the time) you'll know pretty much where you need to be with just a few tweaks.


No. 3. Get on their level both literally and figuratively.
In the literal sense…photographing a child on their level makes such a difference. The perspective of the shots is so wonderful when they aren't just taken from the height of an adult looking down on their activity. Get in there, be willing to get a little dirty. In the figurative sense…talk to them on their level, get involved in their lives, their interests. Become a playmate for the child. Play with them and don't make it so much about the camera, let it fall into the background. When they are comfortable, the real fun will begin. 


No. 4. We don't all smile all of the time.
Forget making them smile. We don't all smile all of the time. Some of my favorite portraits of my oldest girl were taken when she was 9 months old. It was during a portrait session and the photographer was so bound and determined to make her smile. She just wasn't going to do it and I was sensing our "happy" time fading. I finally said just take what you get, I don't care if she is smiling or not. Her "serious" look was so cute. I love looking back at those photos. Her thoughts look so deep. Who knows what she was thinking but I like to come up with ideas. She was probably thinking the photographer was a nut and why are they all in my face yelling at me to do something I don't want to do.


No. 5. Pay attention.
Frequently, a child will drive where a photo session is going to go. Let them. Some of the best pics come from watching a child engaged in something that interests them. The one below of my  baby girl was all about her wearing that bandana (or as she calls it "badana"). She wanted to show it off. And the one below that of my oldest…it was as if she were a model and it was all about the poses. She made up most of them without me really having to give her much direction. She was having fun with it...I don't think the sunglasses, tutu and attitude of being a brand new 4 year old, at the time, hurt either! Let them lead you and then be ready. How many times do they do that one amazing thing when you put the camera down.


No. 6. Have fun!
If you aren't enjoying taking the photos, they won't enjoy having their picture taken. So make it fun. Let them see the photos on the back of the camera, if they want. Let them be a part of it! No one's going to die if you don't get the photo, so have fun with it and then, I promise, you will get it!