Showing posts with label blending. Show all posts

Tuesday, August 16, 2011

Touch Up Tuesday: Blending

Blending:

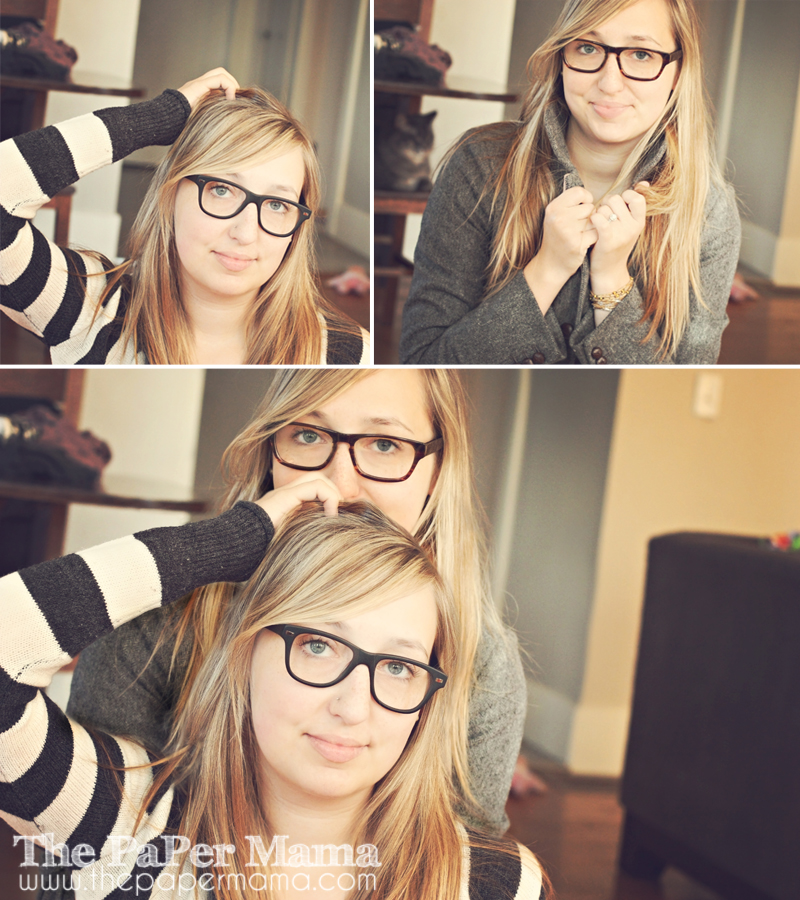
Edit: Oh, blending. One of my fave things to do. I have shared my blended photos with you guys MANY times! Click here to see our previous blending posts for more tips on how to create them. It's a SUPER simple technique. Just takes a little patience and an eraser tool/clone tool in photoshop.

For the above blended image I dragged and dropped the first photo over the second photo. I lowered the first photos opacity to 50% (so I could see the image behind to see where I need to erase). And, I erased (make sure the Eraser tool is set to a soft erase). The hard parts are always where there are little strands of hair.... For this I lower my eraser tool to 50% and erased lightly over the hair... this way you can see the image behind... AND, still see the hair from the other image.


Photography love...
 
Link up your Touch Ups below! Linky's always close at 11:59 PM Wednesday evenings (Pacific time).


Tuesday, May 31, 2011

Touch Up Tuesday: Clone out that background!

SOOC:

Edits:

Edit: What? Yes. ANOTHER Clone Tool Touch Up Tuesday! :D It's one of my favorite tools... and, I use it ALL the time. This is my friend's little 2 week old baby, Ayana. I don't actually have a backdrop or any other fancy accessories for photography. SO, I have to make-do.

I found a plain blanket and propped it up. But, I noticed with some of my photos the home was still showing. This was a really easy thing to fix with the clone tool since my blanket I was using was very simple with no print. After I fixed my background and did a couple of other edits to the photo... I ran a few of my favorite actions from Pamela Toppings and Paint the Moon.

I've used the clone tool many times in the past if you're curious to learn more about it. Just scroll through these clone posts. :D


Photography love...
 
Link up your Touch Ups below! Linky's always close at 11:59 PM Wednesday evenings (Pacific time).


Tuesday, May 17, 2011

Touch Up Tuesday: Many Hands.

Before:

After:

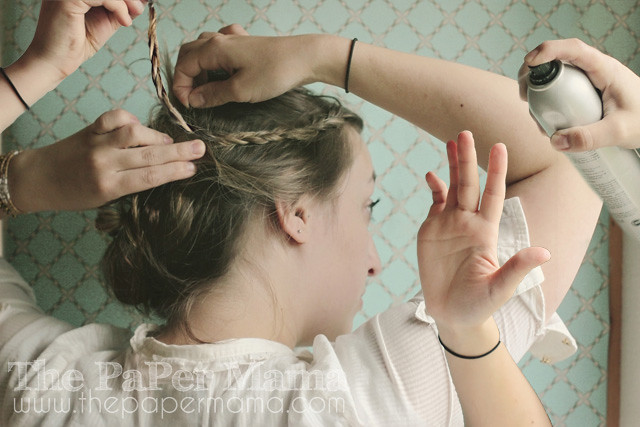
Edit: I don't know if you all noticed or not... but, I LOVE blending images. Love it. It's so much fun to see the end result! So, after editing all my images for this hair tutorial... I blended together some of my images... erased everything but my hands. Ta dah! If you'd like to see other blending edits I've done... click right here to scroll through my "blending" posts. :D


Photography love...
 
Link up your Touch Ups below! Linky's always close at 11:59 PM Wednesday evenings (Pacific time).


Tuesday, May 3, 2011

Touch Up Tuesday: Swapping heads.

SOOC:
april 070 copy copy copy 2

After:
april 070 copy copy copy

Edit: This photo is from a blog meetup I went to this last weekend. We did the March for Babies. This was taken pretty much at the end of the walk. I had 3 group photos... and, in each one there were at least a couple of people that were making VERY silly faces or looking away/down. So... I took the best faces of each person from the different photos and combined them into this photo. I even had to photoshop Jill (last on the right) into the final photo. :) I think it turned out pretty well. I talk about swapping heads in another Touch Up Tuesday here if you'd like to see how I did it. Happy Tuesday!


Photography love...
 
Link up your Touch Ups below! Linky's always close at 11:59 PM Wednesday evenings (Pacific time).


Tuesday, March 1, 2011

Touch Up Tuesday: Swapping heads

On Sunday I was taking some photos of mine and my friends baby (Coral and Ruari)... they were wearing matching outfits! Can't miss that! :) There was one photo that I liked Coral's smile: but, Ruari was looking down. The other photo Ruari was looking up, but Coral blinked. So....


First photo:


Second photo:

Blended together:

Edit: First I grabbed the Lasso tool. I set the feather to 40. I cut around Coral's face in the second photo... and dragged and dropped it into the first photo. Since Coral's head placement was almost in the same place for each photo... it wasn't too hard to blend them together. Using the Eraser tool set to 50% Opacity I erased the edge from where I cut with the lasso tool. Flatten the image and I'm done! Yay!


Photography love...
 
Link up your Touch Ups below! Linky's always close at 11:59 PM Wednesday evenings (Pacific time).


Monday, January 17, 2011

Tutorial... Anthropomorphism: Giving life to fruit.

*Update: Whoops! Sorry guys... apparently I  turned off the comments. SORRY! It's back on.

Transform your fruit into the beauty you ALWAYS knew it could be.

{The Paper Mama}

Anthropomorphism is a term coined in the mid 1700s to refer to any attribution of human characteristics (or characteristics assumed or believed by some to belong only to humans) to animals or non-living things, phenomena, material states and objects or abstract concepts.

Hey everyone! Do you think your fruit is a bit boring? Needs a little more personality? Well, look no further! Your fruit can now look just as beautiful as you are!

Today we are going to learn how to give our fruit (or, really ANY inanimate object) life. I originally found a different tutorial for this same thing here. But, as I was following that tutorial... I noticed a few things that I would like to add. Note: I use Adobe CS3

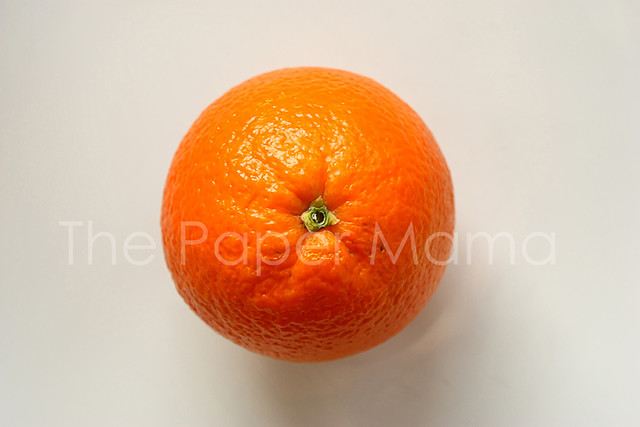
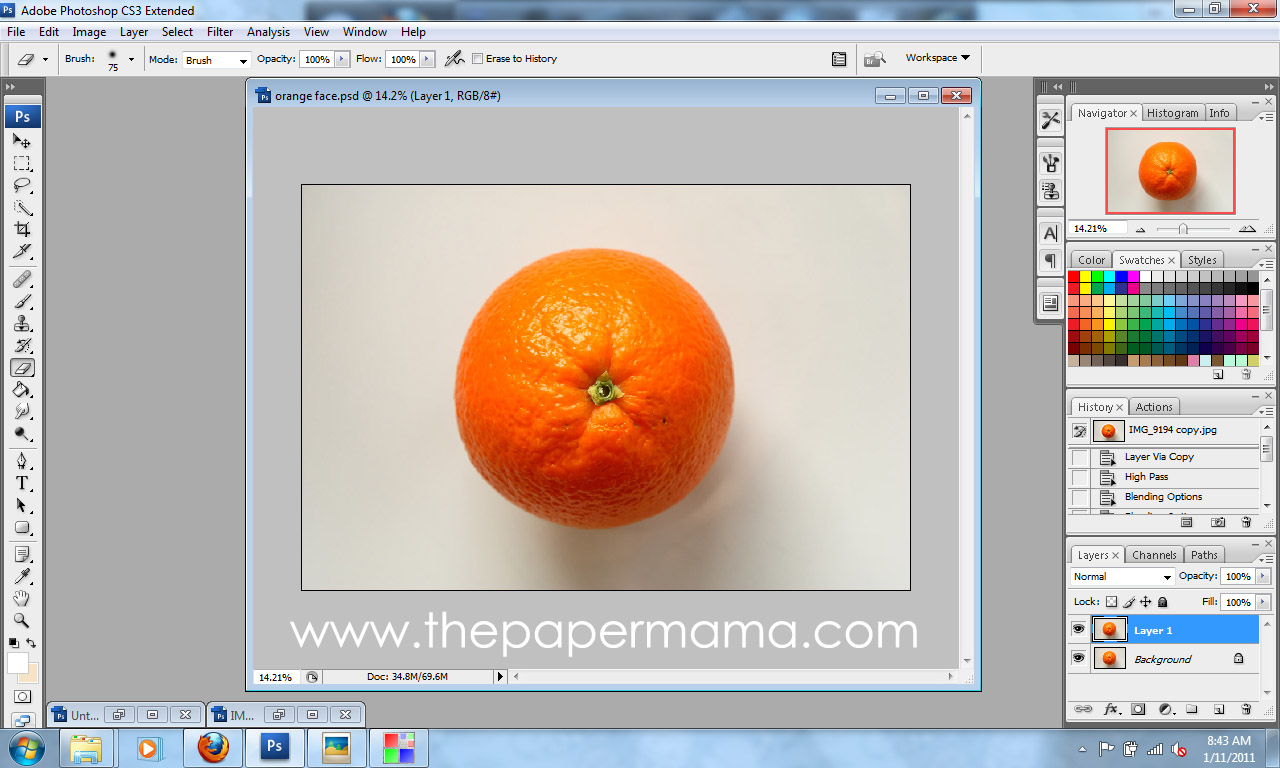
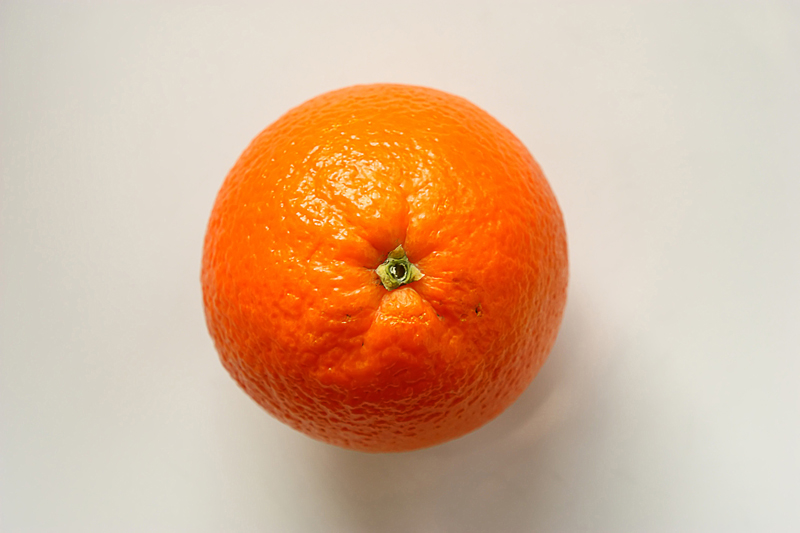
One: Start with a basic photo of a fruit. You are MORE than welcome to use my 800 x 533 orange photo by going here (once you click on that link... Right Click and choose save). Or, here's a pear from the other tutorial you are welcome to use too.


{You can click on any of the tutorial photos below to see a larger view}


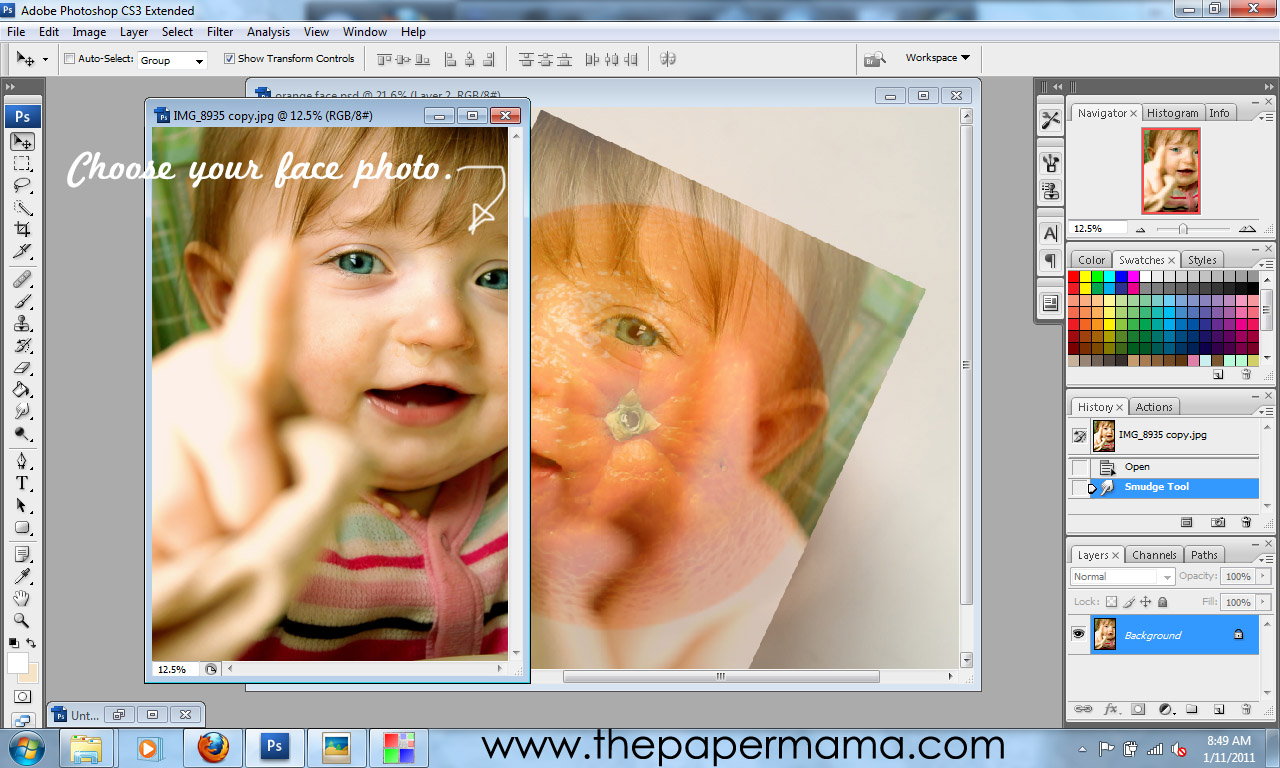
Two: Find a face photo and drag and drop it over your fruit photo. I think using a photo with an open mouth looks a little more interesting. Lower the face photo's opacity to 60%. Then, rotate and resize {Edit>Free Transform} the face photo to a position you are happy with.


Three: Using the Eraser Tool... begin cleaning up and erasing any part of the face photo that is NOT on the fruit. Then, erase and clean up the details of the face. You can raise the face opacity now if it helps.


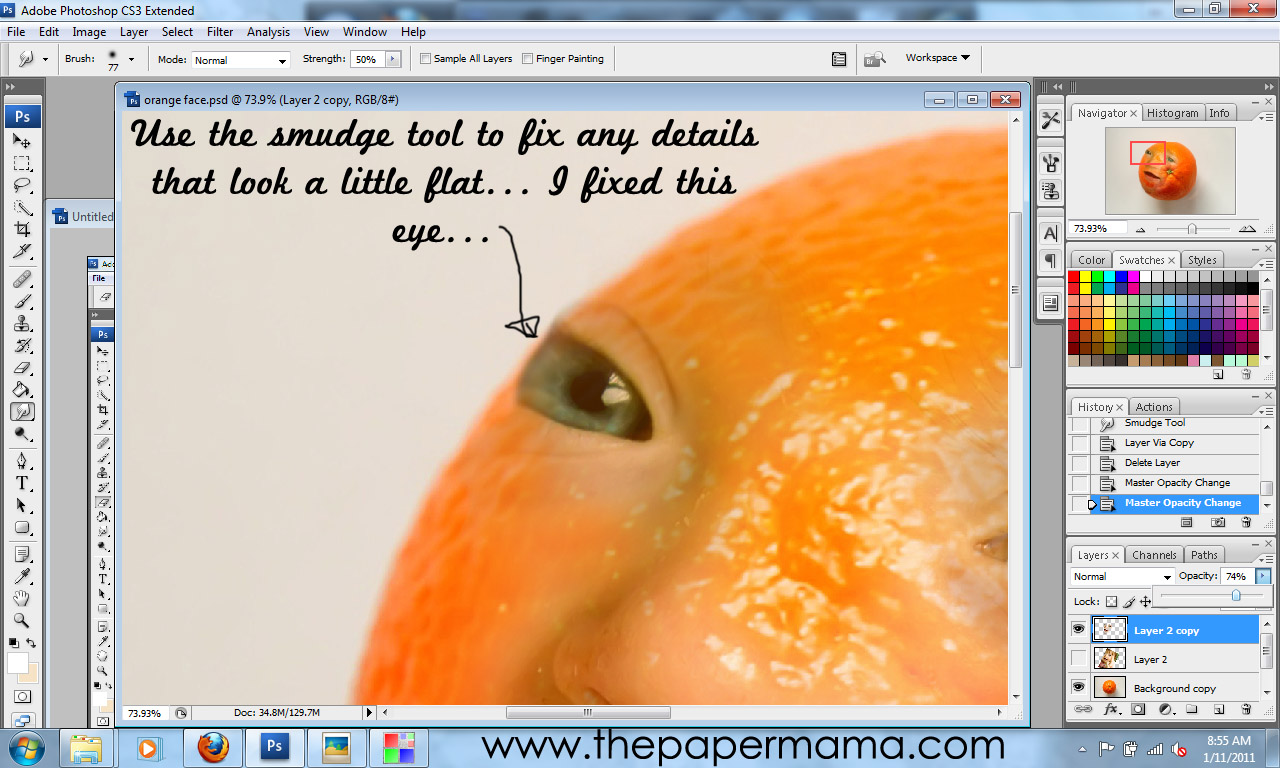
Four: Since I chose a photo that had part of my baby's eye cut off... it left a very sharp angle on the eye. To fix this I used the Smudge Tool to slightly smudge her eye so it was softer and more round.


Five: Make sure your face photo opacity is back up to 100%. Make a copy {CTRL+J} of the face photo. Hide the copied face layer {Click on the eye in the layers list}. Clicking back on the original face photo adjust the color balance {Images>Adjustments>Color Balance} of the face to match the color of the orange (or whatever the color of fruit you are using).


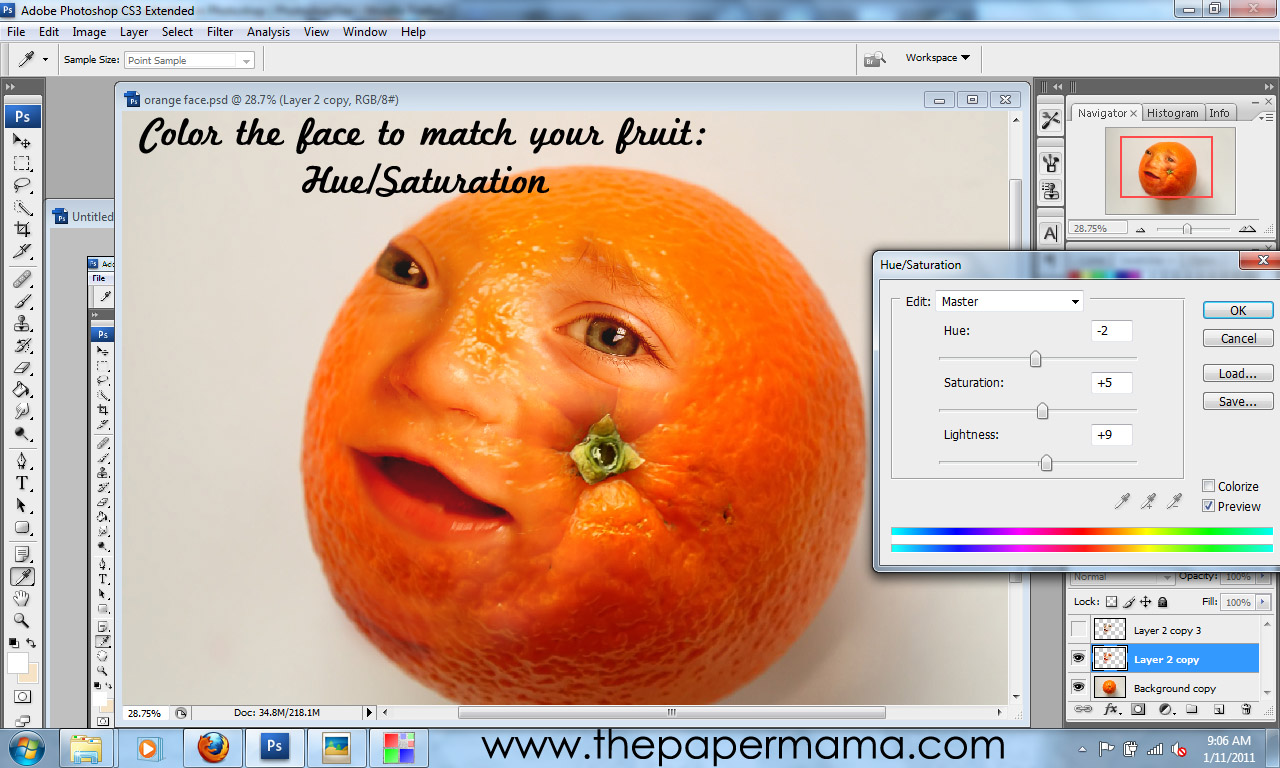
Six: While on the original face layer adjust the Hue/Saturation {Images>Adjustments>Hue/Saturation} of the face to match the color of the orange (or whatever the color of fruit you are using).


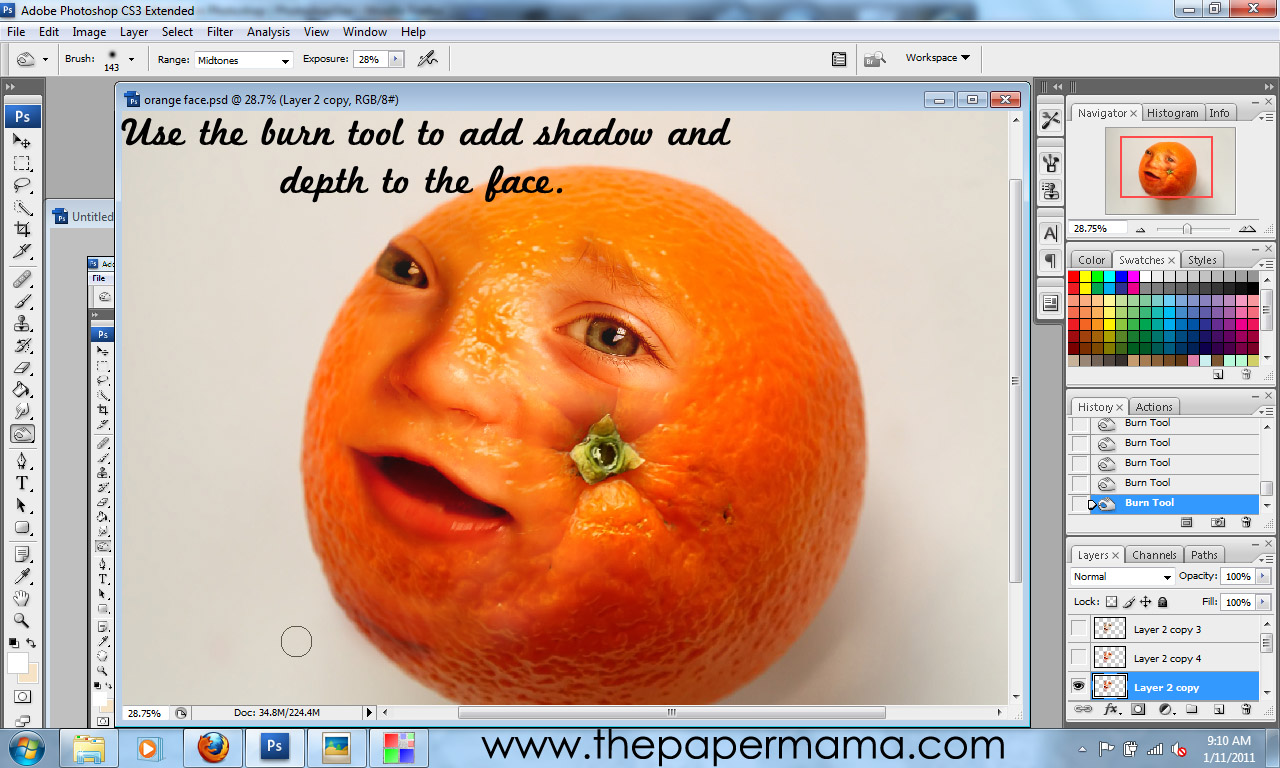
Seven: Select the Burn Tool. Adjust the burn tools exposure to about 20%. Using the burn tool add shadows and depth to the face photo. This will give a more realistic look.


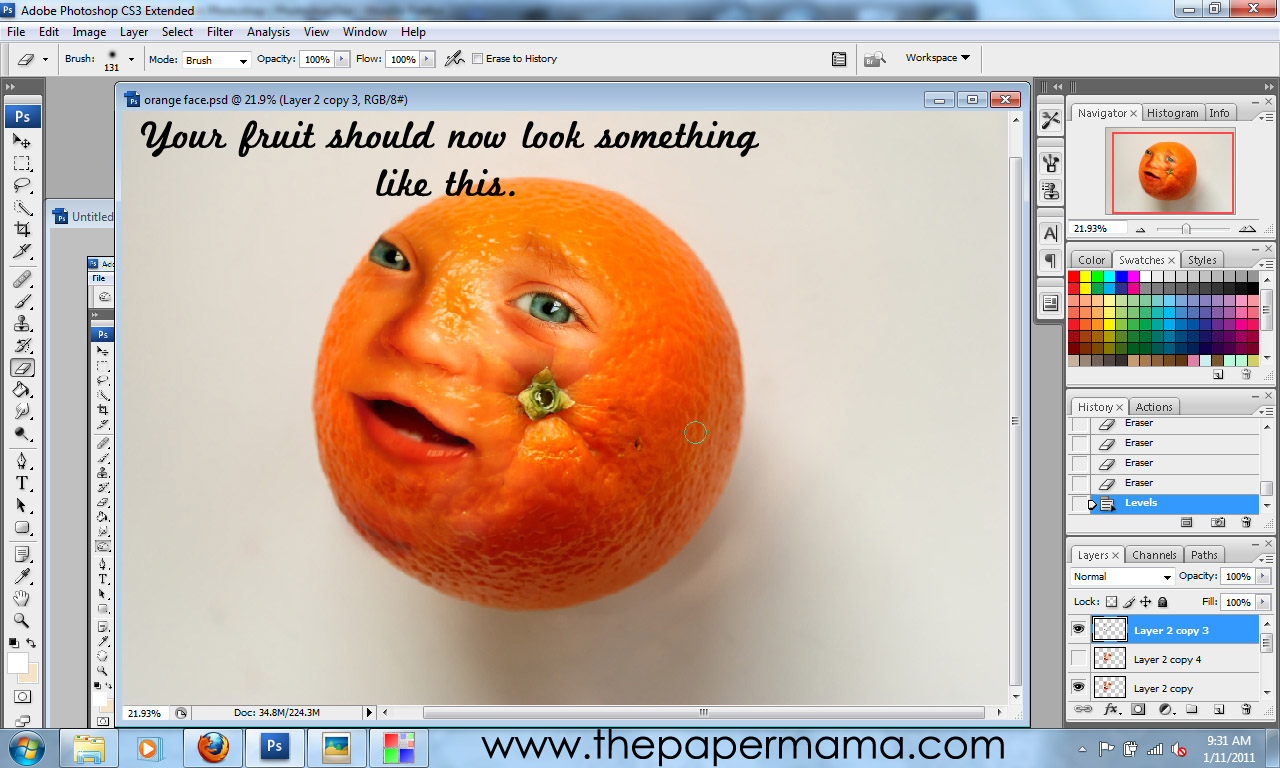
Eight: Go back to the hidden face layer copy and turn it on. Use the Eraser Tool to erase everything from the face layer copy except: whites of eyes, nostrils, and inside the mouth. If you feel the eyes, nose, and mouth are a little too dark... feel free to repeat steps Five and Six on the face copy layer to your taste.


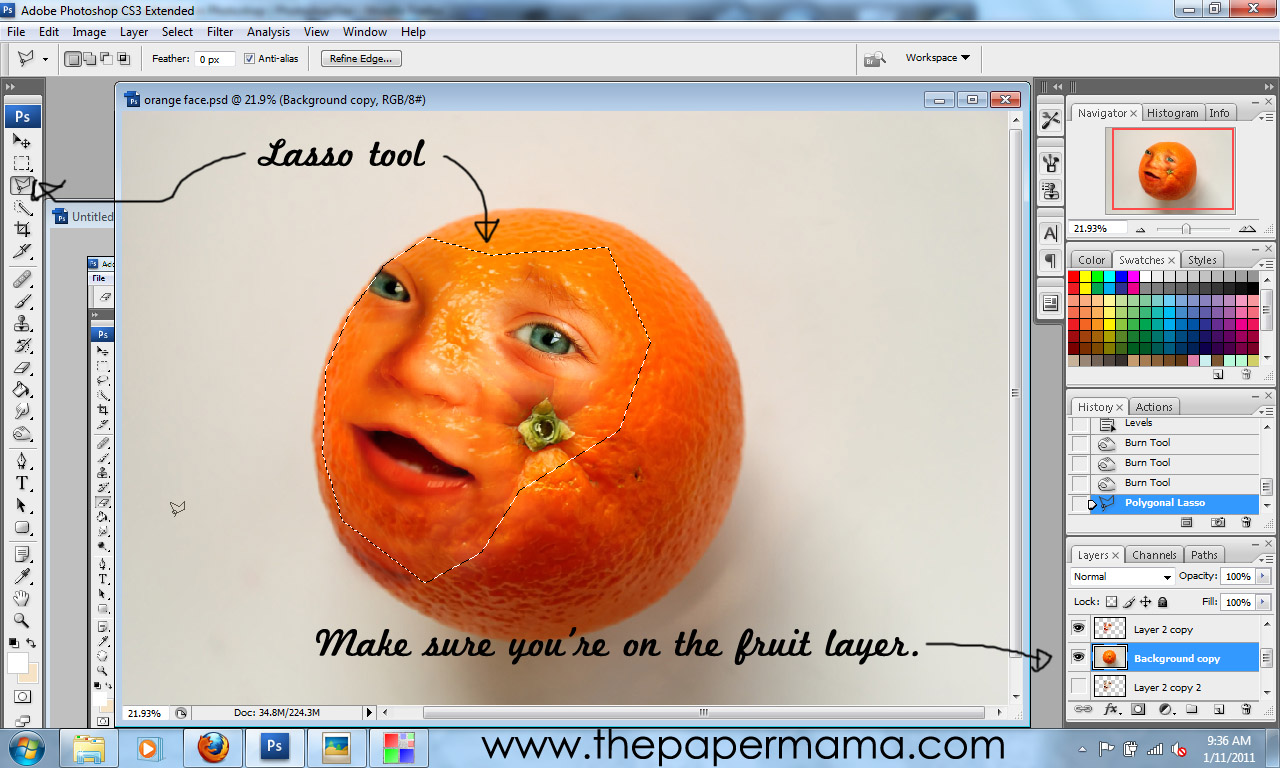
Nine: Select the Lasso tool (it's up to you which sort of lasso you'd like to use). Select the orange photo layer. Use the lasso tool to lasso the piece of fruit around the face. Duplicate the lassoed area {CTRL+J}. You should now have a copied portion of the fruit. Move this layer to the top of your layers list.


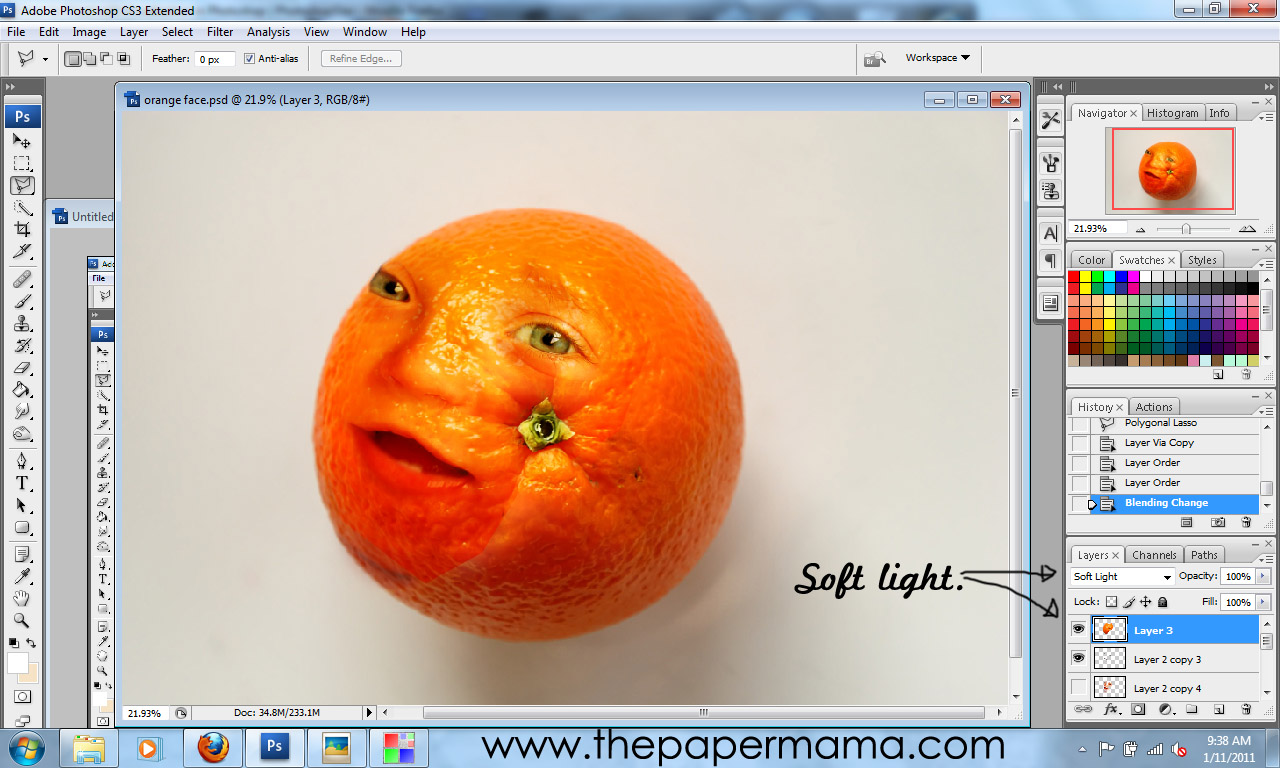
Ten: While on the lassoed fruit layer... set the blending mode to Soft Light. Adjust the brightness and contrast of this layer {Images>Adjustments>Brightness/Contrast} to your taste. Select the Eraser Tool, set on a Soft Brush, to erase the edges of the fruit lassoed layer. Smooth things out a bit.


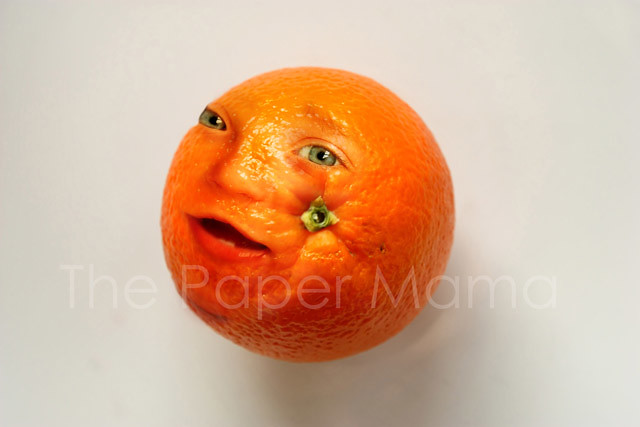
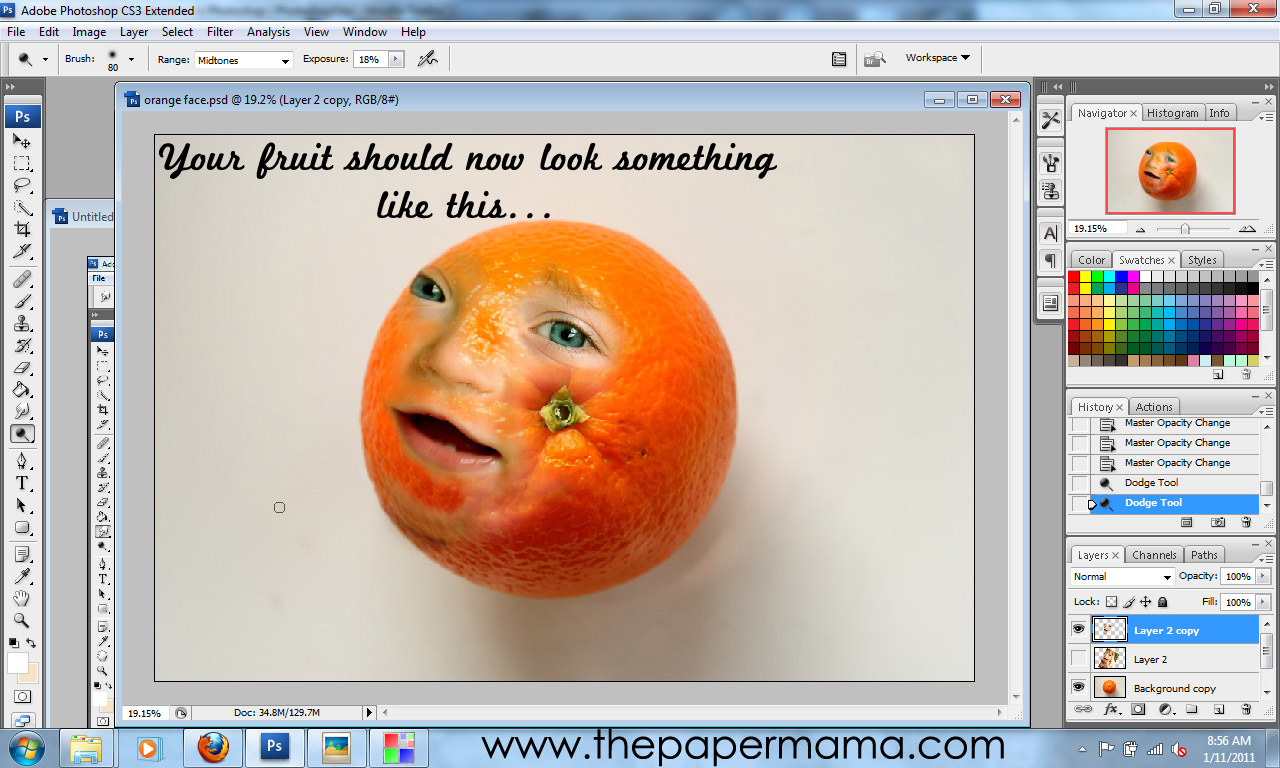
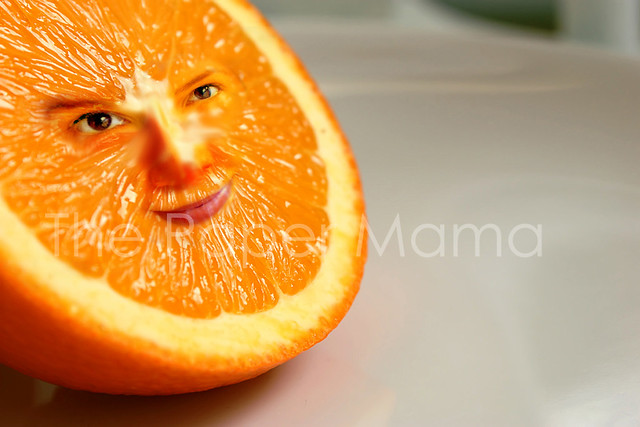
AND, you're done! Your photo will hopefully look something like this:

{The Paper Mama}

OR this... (I made an Ashley Orange version for Ashley Sisk, one of our contributors):

*Note how this piece of fruit is angled. I transformed the perspective {Edit>Transform>Perspective} of the face layer to match the angle of the orange.

OR this:

{via}

OR this:

{via}

We'd LOVE to see if you try this out for yourself! If you do... please add your photo to our Flickr group! AND, comment below with a link so we know you did. :D

Friends that have followed this tutorial:
Monday, November 1, 2010

Tutorial: Blending your images together for a fun self portrait!

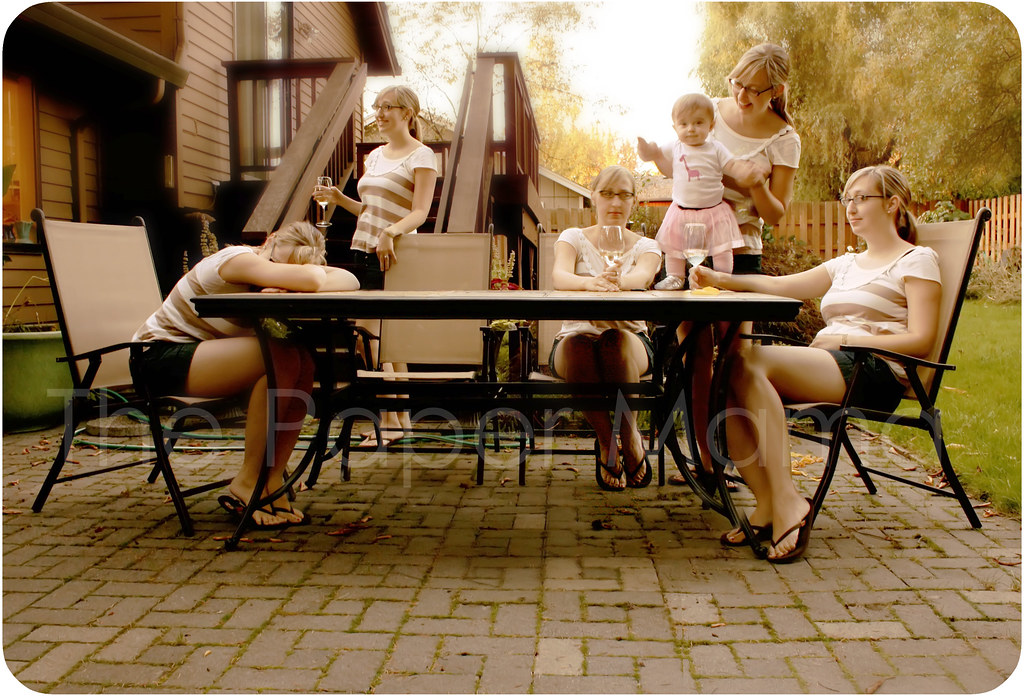
So, when I posted the photo below... I had MANY people asking how it was done, and if I could share my secret. Well, yes. Yes I can!

{The Paper Mama}

It's really a simple technique. I use Photoshop CS3. I'm not sure what other editing programs will work to create this... but, if you can do layers... then you can probably do this!

1) Set up your camera. Set up your camera in a spot where it wont be moved or nudged. You really want it to stay in one spot. You can see in the photo above (on the right side, by my feet) that at one point I had nudged the camera just a tiny bit... this caused the images not to match up completely. The table leg looks a little wonky. But, I'm not too bothered by it. :D

Don't forget to think of the lighting as well. You want a location that the light will stay consistent. This is pretty hard to do here in the North West where we have rain one minute and sunshine the next.

Set the camera to auto focus.

2) Take your photos. I set my camera to take 8 photos with the timer for each position. I wanted to make sure I got at least one photo that I'd like (you know... to avoid those double chins!).  Move to different locations. Make silly faces. Maybe set it up to have your positions interact with each other. See the photo below, one of his personalities has hit the other personality.

{via}
Be careful not to move anything (except you and any props).

3) Upload those photos to your photo editing program. After you take all your photos, you can now blend them together (I would do this after editing any contrast or other basic edit needs your photos may need).

Open all the photos you'd like to use. Drag and drop the photos so they are all layered over each other.

Grab your eraser tool (opacity set to 100%) and erase bits and pieces of each photo so the parts you want to show through, show.


There was one instance where my wine glass was going to be positioned over Ruari's skirt. It would look like she had a giant hole in her skirt if I just erased the whole thing, so I adjusted the eraser opacity to 31% to erase the see through area.


So, HOPEFULLY... You will end with something that looks like this:

{The Paper Mama}
Or one of these:

{via}
{via}
I hope this helps! If you use this tutorial to create something, please share! We'd love to see it in our Flickr group. Thanks!

Lovely people that have tried out this tutorial:
- Mumsyhood
- Un Monde Magique
- Missy Cakes Place