Hello everyone.. I decided for my first post on here that I would like to give some simple steps on how to add textures to your photos using Photoshop Elements 8. When I first started using photo shop I didn't know exactly how to add texture so as I read and googled I found some very simple and quick steps that I use faithfully today.
Now you can either edit your photo first before adding the texture or after. I found that doing one or the other can give you two different looks. So my best advice is to mess around with it and see what you think is better.
First:

Then...

(I have found that putting your textures into one folder on your desktop is the easiest way to find them.)
Once you placed your texture don't panic...

*you cant really read the other part on there it says... "Then fix the opacity to your liking."
After that...
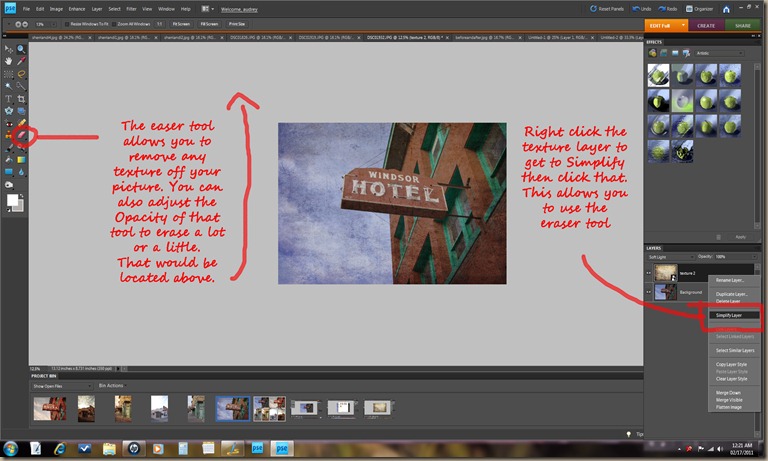
Once you get comfortable with the erase tool you could also use the brush tool and brush white or black on.
White lightens it and Black darkens (make sure you fix the opacity of that tool too.)
FYI: When using that tool it DOES NOT erase the texture it sort of blends it in more and keeps the textures color.
Here are some places that I have found which gives away free textures: Jerry Jones, Skc Photography, Charlene McCoy Photography, and Flickr. (you can also Google "free textures for Photoshop" which pulls up a lot too.)
The best advice I can give you about textures is to play with them and try using different tools in Photoshop or even edit the texture before using it. You never know what surprises textures will give your photos.
Here are my latest photos then I have put texture too. If you want to know how I exactly edited all of them please click each picture.


Now since I am a newbie to this blog... I would like you to get to know me at my personal blog The Daily Wyatt. It is mostly a photo blog about my life with my son but I also host a 365 days in pictures linky every Saturday (join the Flickr Group today! *this is where I pick 365 days in photos linkys Top 5 each week then do a Vote off each month for the winner.) and starting next month I will be hosting a linky called Texture Thursday.
Thanks for reading
I hope to see you around soon.
Audrey ;)

Also don't forget about the linkys that are hosted here: Show and Tell and Touch Up Tuesdays. Plus if you haven't yet joined the Flickr groups please do...
Paper Heart Camera, 365 group, 52 weeks of me
We love seeing every ones wonderful photos plus we also highlight those photos on here! :D


 I use photoshop to edit my photos, so once I am done with my edit I then add my texture. Kim Klassen is an amazing place to get textures. And MCP Actions has a free add texture action on her blog page. It makes it easy and simple!
 Once you've added the texture of your liking, I like to mess around with the layer option, i.e. multiply or soft light and opacity.
 And there you go, a vintage look to a fun picture! Super easy!
 When you add texture to photos with faces and people, I like to use a soft brush or eraser to erase some of the texture off the subject. That way it your subject stands out and doesn't have any weird lines or colors on them.

 And sometimes, just keeping it simple makes all the difference. You don't always have to make it dramatic to give it the right look.


