Showing posts with label photoshop. Show all posts

Friday, July 20, 2012

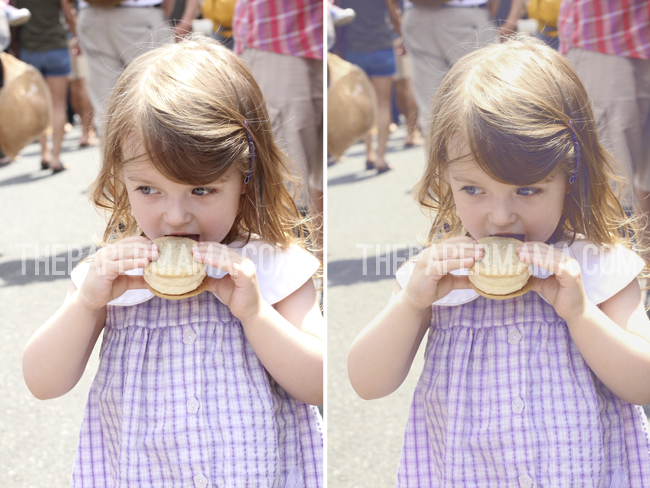
Quick Vintage


I'd like to share a quick way to add a vintage haze and color to your photo (without overdoing it). I do this to most of my photos. I've created a few different actions that I personally use over and over. This is the most simple way I can share. Using your Selective Color (one of my favorites) and Levels layers in Photoshop.

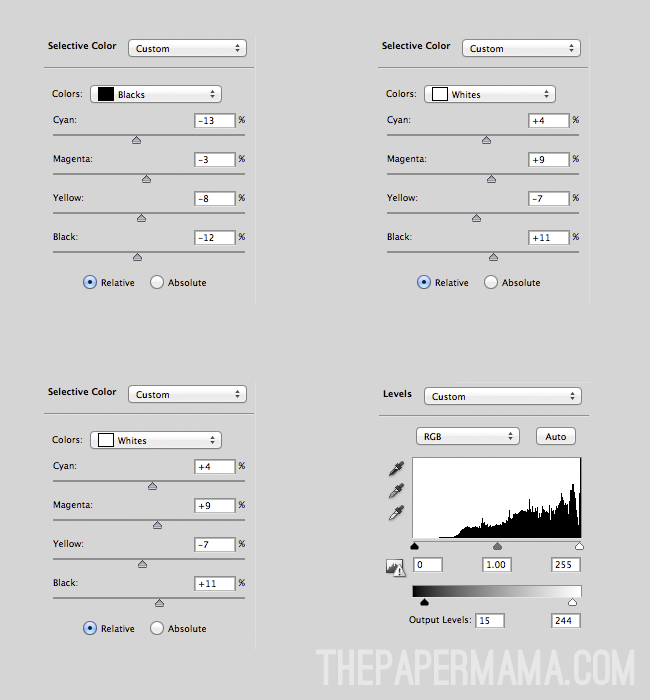
Open up your photo you'd like to edit. Do any basic edits to your photo first (like contrast/brightness). Add a Selective Color layer and play around with the blacks and whites. Below you can see the different selective layer numbers I have for the black and white adjustments. These numbers will be different for you... it all depends on your taste and style.

Once your happy with the coloring you get from your Selective Color layers... add a Levels layer. The only change I will make with this layer is adjusting the output levels. Again, you can see my numbers below. I like just a teeny fog... nothing too intense. Adjust these to your taste as well.
Flatten your photos... and, you're done! Enjoy!


Happy Friday everyone!

 - Chelsey, The Paper Mama

Wednesday, July 18, 2012

a simple and clean edit using photoshop

Hello!! I am so excited and so honored to be posting on Paper Heart Camera! This is my first time posting, so I am just a little nervous. :)

Today I wanted to share a quick tutorial on a simple and clean edit for your beautiful photos. I usually do this to almost every photo when I edit and then I play around with other actions and textures to enhance my photos even more.
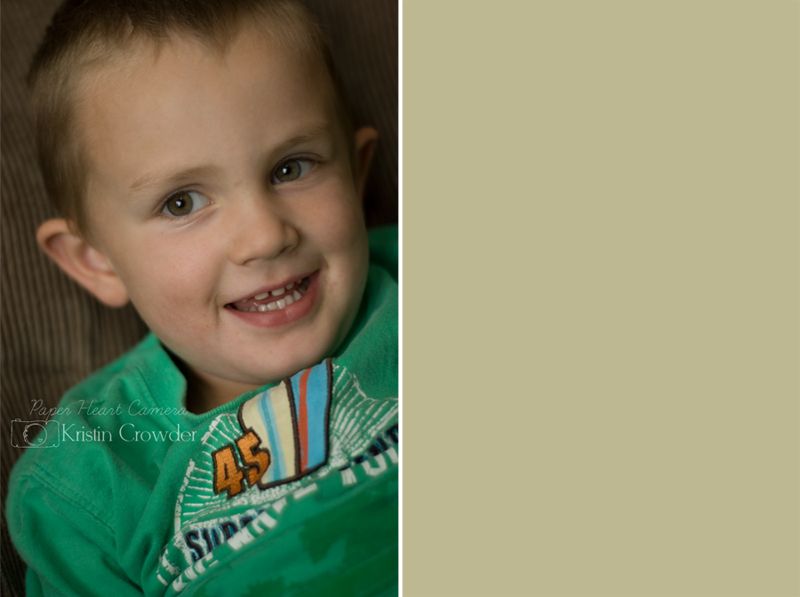
Photobucket This is a photo of my oldest on his last day of preschool. I took it indoors facing our open windows so I could get the catch light in his eyes. It wasn't the most perfect lighting but hey... I got him both looking and smiling at the camera! 
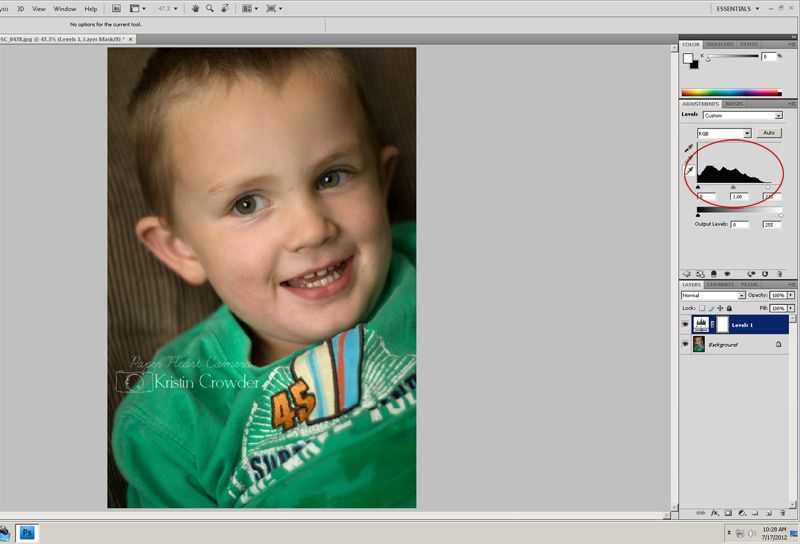
So first off, I open my image up in Photoshop and adjust my white balance since I can tell that I am a little off. 
Photobucket I am sure there are many simple and other ways but I like to go to Layers --> New Adjustment Layers --> Levels and adjust it to my liking. This way it lightens up the image a little and corrects the exposure some.
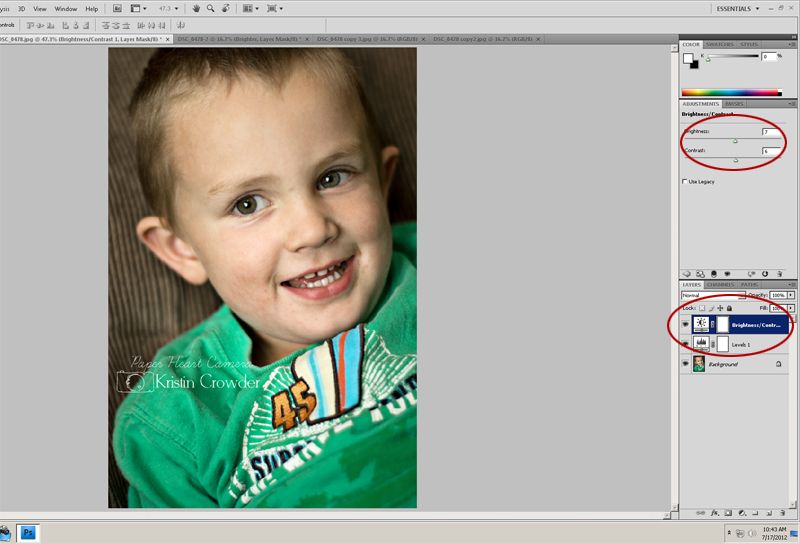
Photobucket Then I like to adjust the brightness and contrast. So again I make a new adjustment layer by going to Layer --> New Adjustment Layer --> brightness and contrast. I adjust it ever so lightly so that that it gives the image just a little depth but not so drastic that it looks weird. So for this image I set the  brightness to 7 and the contrast to 6.
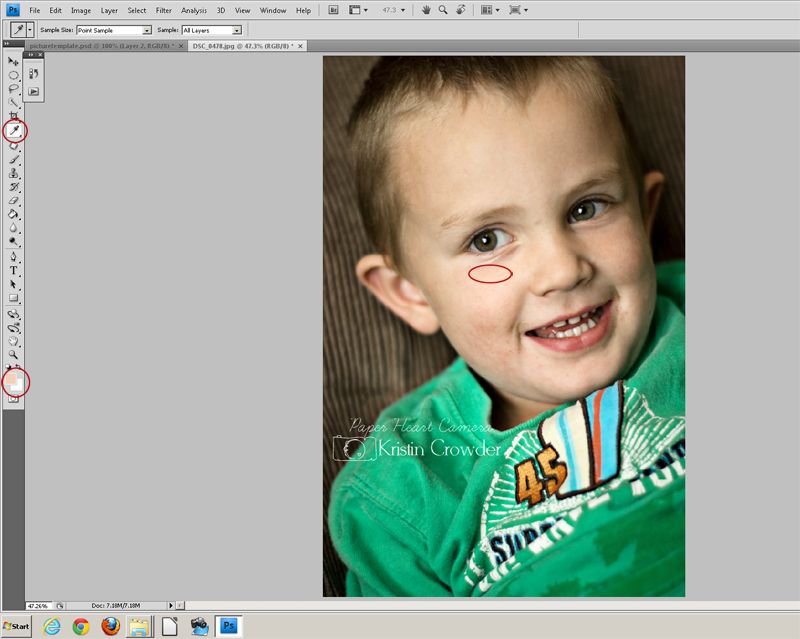
Also, for this image I wanted to smooth out his skin some and clean up around his mouth just a little bit. I should note that there are a lot of amazing actions that are made for smoothing and softening skin, but for this quick exercise I am going to show you a quick and simple way I do it sometimes.
Photobucket I take the eye dropper tool in the tool bar and select the almost lightest part of his skin, in this case right under his eye on his cheek bone. I then take a soft white brush with the opacity set to 11% and softly paint along his face and around the mouth. Since his face is slightly darker on the other side I used the eye dropper tool and selected again on the opposite cheekbone to paint along that side.
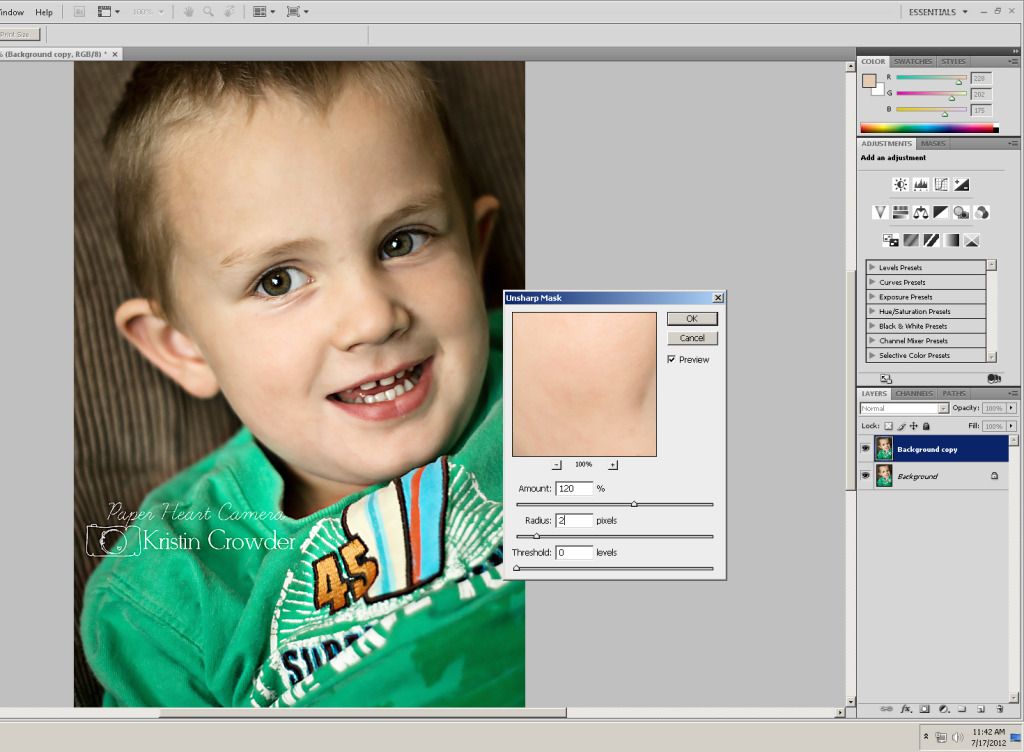
I should note that before I begin painting I like to copy my background and paint on the copy layer. That way if I overdue it or it looks too fake I can just toss that layer without ruining the previous work.

Photobucket Once I am finished with my clean edit I like to sharpen it a little. I go to Filter --> Sharpen --> Unsharp Mask and adjust Amount: 120% Radius: 2 pixels Threshold 0 levels.
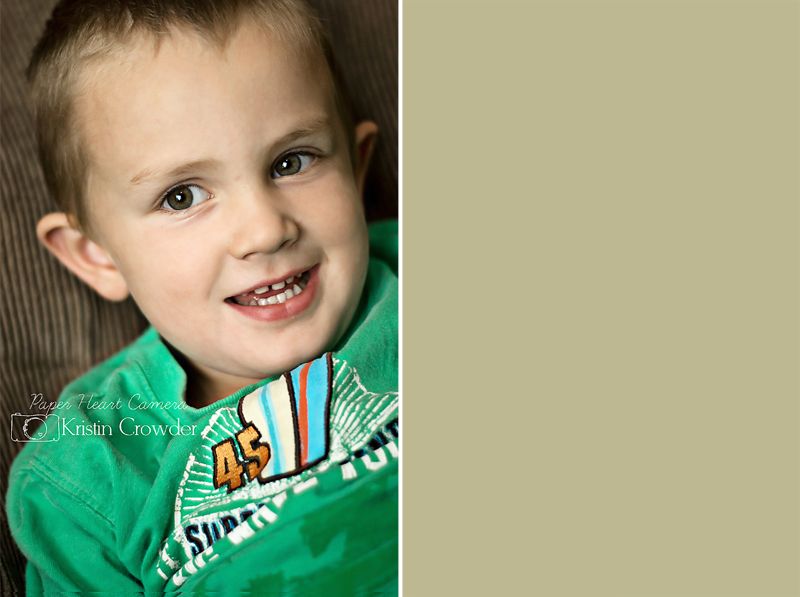
Photobucket And there you have it. A simple and clean edit!

Photobucket And here is the before and after side by side. 

Hope you enjoyed this tutorial. You can check out more of my images over at k.c.captured if you like!

 Photobucket

Friday, June 29, 2012

How to Create a Matte Effect in Photoshop


Photography is one of those things that continues to evolve week after week, month after month, and year after year. It seems that for a while, every where you look there are photographers trying to emulate and replicate images that the other has shot. One key element to remember, however, is that each photographer has their own sense of style. Rebecca talked a bit about Finding Your Style in her post on Wednesday and how just because you are visually drawn to something doesn't mean that you have to commit to it.

Once I mastered the act of using my camera in manual and taking advantage of how my camera worked, I knew that I needed to figure out what kind of images reflected who I was an artist, both behind the camera and behind the screen during post-processing.

I love light. I love the natural haziness and mystical awe created by beautiful sunlight.

Unfortunately, here in Alaska that gorgeous sunshine and golden hour of photographic bliss that many professional talk about is rare. And when it does occur, it's often late into the evening (think close to midnight during the summer) or in the wee hours of the morning (3:00 am photoshoot anyone?).

I spent hours looking through the image galleries of photographers like April Neinhuis and Jenny Cruger. They both created the type of image processing that I adored and hoped to recreate in my own way. After hours and hours of playing in Photoshop and browsing the Clickin' Moms forum, I found a way to replicate that style that I loved.

Please keep in mind when doing any kind of post-processing that it's best to start out with a  properly exposed image and a good clean edit. No amount of post-processing can save an image that hasn't been properly exposed. 
 I start out with my SOOC (*straight out of camera) image:


I do my routine clean edit using a variety of self-made actions and workflow actions from Florabella:


Notice that in my clean edit I slightly over-exposed the skin. That's because the matte effect I'm about to create is going to darken the highlights in the image and bring the skin tones back down to a more appropriate level.

There are several ways to create the matte effect in Photoshop aside from using pre made or costly actions. The two methods I use involve the curves layer adjustment or the levels adjustment. Today I'm going to teach you how to create the matte effect using the levels tool in Photoshop.

When using the levels adjustment, we're going to adjust the output levels. As you can see in the example below, simply adjusting the output levels makes the image lose a bit of clarity and sharpness. It can also easily wash out color and contrast. 


Simply drag the black arrow as pictured to the right to adjust the tone and contrast of your image. This will allow you to retain your matte and haze while still getting a good well contrasted image. 


You want to make all of these adjustments gradually. Use several layers if necessary until you achieve the look that you want. I like for my images to remain full of contrast and color with a hint of haze and matte.

The clean edit compared to my final product:


Next time I'll share how to use the curves layer to achieve a similar, but more dramatic effect.

Use this technique on your own photos? Feel free to share them on my Facebook Page or on the Paper Heart Camera Page!


Written by Courtney Kirkland

Wednesday, December 14, 2011

By Shaunna at Mist and Lilies | Freebie! Frost Template!


Pin It

Ready for a freebie!?
How about this adorable, floral, snow themed template for a photo of yours?


Friday, December 9, 2011

PS Tutorial: Quickly adding a border to your photo!

Hey everyone! It's Mandy from A Sorta Fairytale! Just popping in with a Photoshop Tutorial on how to add a border to your images, quickly!! There is a really fast and easy way to do it, so I'll run you through those steps now!


STEP ONE: Open the desired image in Photoshop!


STEP TWO: Select all (command + A on a Mac or control + A on a PC) > Edit > Stroke


STEP THREE: Choose the width & color of your border. Unless you're working with a layer behind your image, that's larger than your image - you will need to choose Location > Inside.
You can also choose different blending modes & opacity for your border.

Click OK.

And Viola!
{ example one }

{ example two }

{ example three }


Monday, October 10, 2011

Layer modes in PSE

sooc
b&w edit
brown layer 45% opacity
changed the layer to "overlay"

final edit

The point of this before & after?  
Layer mode matters.


Thursday, September 22, 2011

Get creative with textures

I know that a lot of the times I post on here I talked about textures. but I love that we can create images that we want in this digital age. So I just want to do a step by step tutorial to added out the norm textures to allow you to get creative with your photos.

A few weeks ago I went to a balloon festival and the balloons didn't take to the air until really late which didn't give me the ideal light I wanted. So after being bummed out by the photos I took I decide that I was going to save them by added what I wished I could have captured.

Now just know that I used Photoshop Elements 8 so if you use something else some of these tips might not work for you.


before&afterhotballoon 
First you need to open up the photo you want to edit and do your clean edits because you want you photo to be the best it can before you add any type of textures. I know I wanted to make this photo very dramatic. So I searched the internet for free textures for Photoshop and brushes.

The textures I used were these…


Biblical_CloudsNight_Sky_Texture_by_amdillonLong_Grass___Texture_by_StarnaMixedBag-4

How I added it all together was added the warmth to it with a PW action.

Then I added the clouds change they layer to soft light lowered the opacity to my liking and erased the texture over the hot air balloon.

Then added the stars again changing the layer to soft light lowing the opacity erased the texture over the hot air balloon.

I fixed the colors added a sun haze with a coffee shop action. added the grass to make it more alive. (again changed to soft light lowing the opacity.)  I first made a new layer then added the moon with a “moon bush” then I lowered the opacity to make it more realistic. added a vignette then added the border texture.

I think I fixed the colors again with actions. sharpened and reduced the noise and was done. NOW, this took a few hours to get it right. ( and I still see things I would change.) So be patient but do be creative. Textures can make amazing photos if you know how to use them and the only way to learn is by practicing.


sometimes you have to create your dreams

 
Here are some others I took that day that I added textures too so you can see how different textures can change the mood of your photos.
 

hotairballoonscopy8hotairballoonscopy9hotairballoonscopy10

If you guys end up using textures like these I would love to see them! Post them into our FLICKR GROUP so we can get inspired by all of you and link up to the linky I host every Thursday for Texture Thursday.

The Daily Wyatt


Audrey- The Daily Wyatt

Monday, June 27, 2011

Tutorial: Sunny Haze Effect


To create this sunny haze effect, this is what I do:

1)  I select a new LEVELS LAYER by going to LAYER > NEW ADJUSTMENT LAYER > LEVELS...

click on image to enlarge for details.

2)  I adjust my image accordingly.

3)  I then add a gradient layer by going to LAYER > NEW FILL LAYER > GRADIENT...

click to enlarge for details.


I selected the second gradient option and selected an orangish/yellow color.

4)  I made sure that gradient layer was set to MULTIPLY. 

5)  Next I duplicated my main background layer.

6)  I sometimes like to give my images a lens flare by going to FILTER > RENDER > LENS FLARE. 
If I need to, I will go in and delete some of the flares that may be covering the face, etc.


7)  I then want to add the haze, so I go to LAYER > NEW FILL LAYER > SOLID COLOR...
I selected a simple white.
I adjusted the white and made sure to set it to SOFT LIGHT.
I adjusted the opacity and fill.


Of course after this you can go in a do the little extra detail editing, but this is how I get the simple sunny haze look in some of my photographs.

- Shaunna


Captivus Living