


 |
| {The Paper Mama} |
It's really a simple technique. I use Photoshop CS3. I'm not sure what other editing programs will work to create this... but, if you can do layers... then you can probably do this!
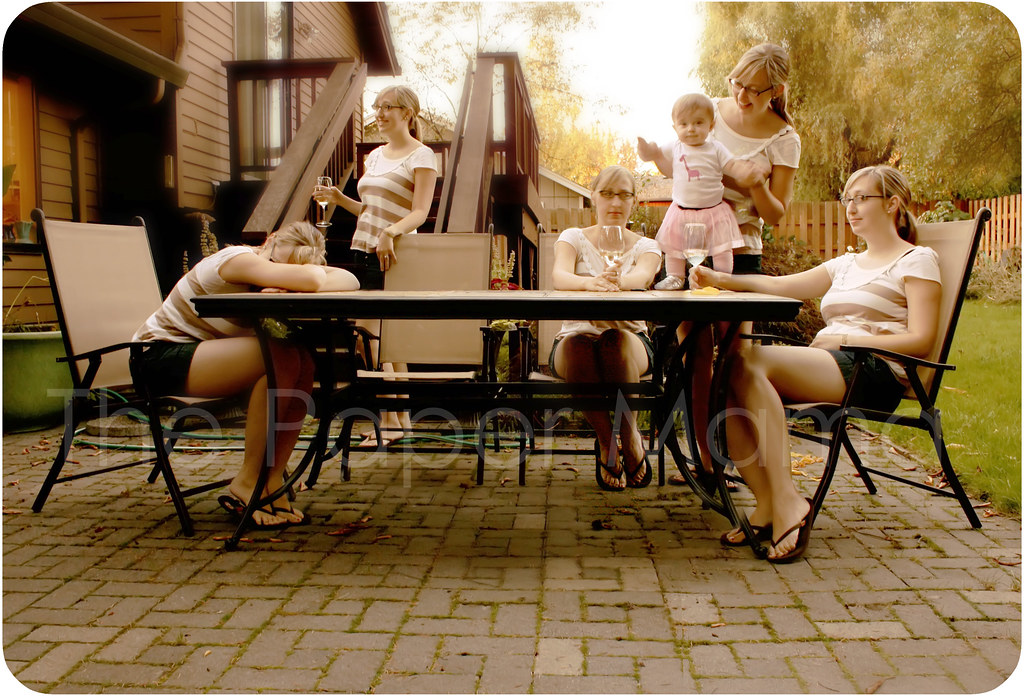
1) Set up your camera. Set up your camera in a spot where it wont be moved or nudged. You really want it to stay in one spot. You can see in the photo above (on the right side, by my feet) that at one point I had nudged the camera just a tiny bit... this caused the images not to match up completely. The table leg looks a little wonky. But, I'm not too bothered by it. :D
Don't forget to think of the lighting as well. You want a location that the light will stay consistent. This is pretty hard to do here in the North West where we have rain one minute and sunshine the next.
Set the camera to auto focus.
2) Take your photos. I set my camera to take 8 photos with the timer for each position. I wanted to make sure I got at least one photo that I'd like (you know... to avoid those double chins!). Move to different locations. Make silly faces. Maybe set it up to have your positions interact with each other. See the photo below, one of his personalities has hit the other personality.
 |
| {via} |
3) Upload those photos to your photo editing program. After you take all your photos, you can now blend them together (I would do this after editing any contrast or other basic edit needs your photos may need).
Open all the photos you'd like to use. Drag and drop the photos so they are all layered over each other.
Grab your eraser tool (opacity set to 100%) and erase bits and pieces of each photo so the parts you want to show through, show.

There was one instance where my wine glass was going to be positioned over Ruari's skirt. It would look like she had a giant hole in her skirt if I just erased the whole thing, so I adjusted the eraser opacity to 31% to erase the see through area.

So, HOPEFULLY... You will end with something that looks like this:
|
| {The Paper Mama} |
 |
| {via} |
 |
| {via} |
Lovely people that have tried out this tutorial:
- Mumsyhood
- Un Monde Magique
- Missy Cakes Place
It's so cool...I'm trying to think of what to do. I'm thinking lots and lots of Pies :)
ReplyDeleteThanks for the tutorial! I'll have to give this a try!
ReplyDeleteThanks for explaining it. That seems like something I could do.
ReplyDeleteGreat tutorial...this is an awesome idea!
ReplyDeleteHa ha how fun!!
ReplyDeleteVery, very cool...thank you!!!
ReplyDeleteSo amazing! I have to admit that I might not have the patience to do it all, but it's so darn cool.
ReplyDeleteThese are some of my favorite things to do...I just posted a few of mine on the flickr account! Great job!!
ReplyDeleteThat's so cool! :D I'll have to keep it in mind. :)
ReplyDeleteThanks for sharing! I've been wanting to try it ever since you posted your photo! Very cool!
ReplyDeletecool will have to try this.
ReplyDeleteSo cool! I can't wait to try this. Thanks for the tutorial!
ReplyDeleteI just tried this... http://mumsyhood365.blogspot.com/2011/01/day-19.html
ReplyDeleteCheers!
I did it and my children LOVED it!!!!
ReplyDeletehttp://daniel117academy.blogspot.com/2011/01/twins-or-triplets.html
I have photoshop CS5, it's almost like, but I don't know how to drag the images to be together. How you doing?
ReplyDeleteThank you :)
I finally do it!
ReplyDeletehttp://un-monde-magiique.blogspot.com/2011/01/fun-portrait.html
Tanks for the tutorial! :)
I did this a while back with my digital camera class- they had a blast! If you have CS4 or 5 you can go to File- scripts and Load Files into Stack- this will put all of your photos on top of each other and even make sure they are lined up! It is a great trick (too bad my class only is running on CS2)! Here are my students examples
ReplyDeletehttp://www.howard-winn.k12.ia.us/hs_art/CHS_Art_Department/Digital_Camera_Projects/Pages/Multiples.html and mine http://thebluehousestudio.blogspot.com/2011/05/i-need-more-of-me.html