


Earlier this year, I stumbled upon a tutorial on I Heart Faces called: "In the Fairy Garden." At the time, I was so excited to use it that I wrote my own variation of the tutorial for Photoshop Elements - HERE. I used those same steps to create the photo I submitted to Pioneer Woman (you know, the one that made Group 1...even though it didn't make it onto the finals), and then I used it again on my Macro Monday this week...teasing you that I would give you a tutorial today. Well, wait no more...Ashley Sisk is bringing you the "Fairy Garden" effect here at Paper Heart Camera!
I've put a lot of work into recreating each step using screen shots and trying to simplify it the best way I know how. But you may also want to look at the original tutorial to find an approach that works best for you. I also seriously need to thank Michelle Johnson at Love that Shot for writing the original tutorial and turning me on to this effect!
Program: Photoshop Elements (I use version 7)
Estimated time: 15 minutes
Materials (open and download files): A clean processed photo of your choosing, Garden Lights 1 and Garden Lights 2.
Actions: We'll be using Coffeeshop Photography's Sun-Kissed Action and a Layer Mask (if you don't already have one - it doesn't automatically come with PSE). Download HERE before you get started. I've linked nearly everything you need - all free. Before you get started, you may want to download and install the actions. Here's a great tutorial from the Texas Chick on installing actions.
With all that said, open your cleanly processed photo (I decided against walking you through basic processing for this tutorial) - here is mine.

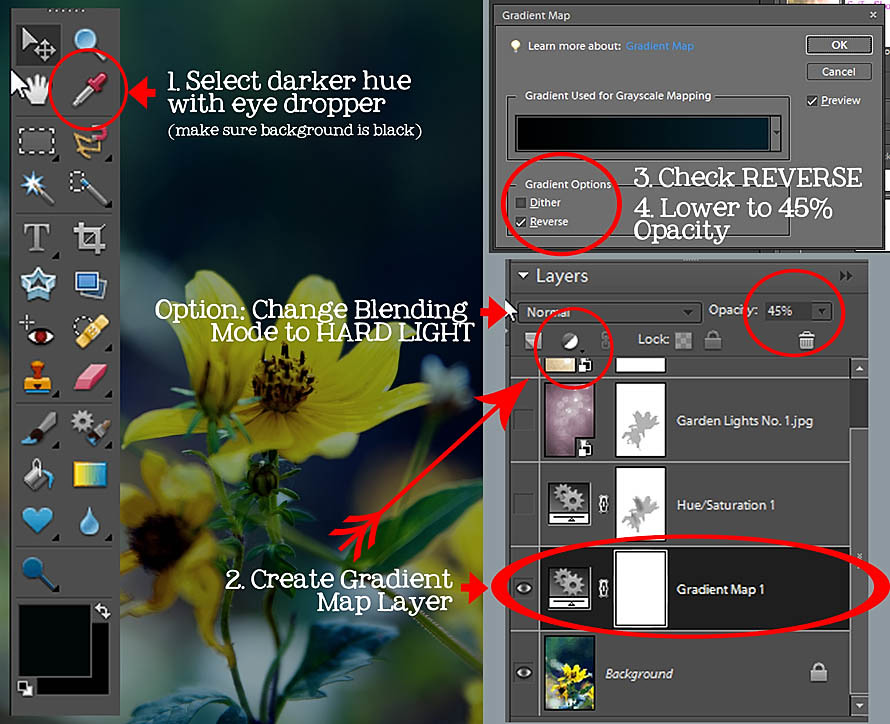
Step 1:
- Select one of the darker hues in your photograph using the eye dropper. Make sure your background is black and the new darker hue will be your foreground.
- Create a gradient map layer (in your adjustment layers).
- Check reverse
- Lower the opacity to 45%.
- Optional: You can change the gradient map layer's blending mode to HARD LIGHT for a slightly different look.
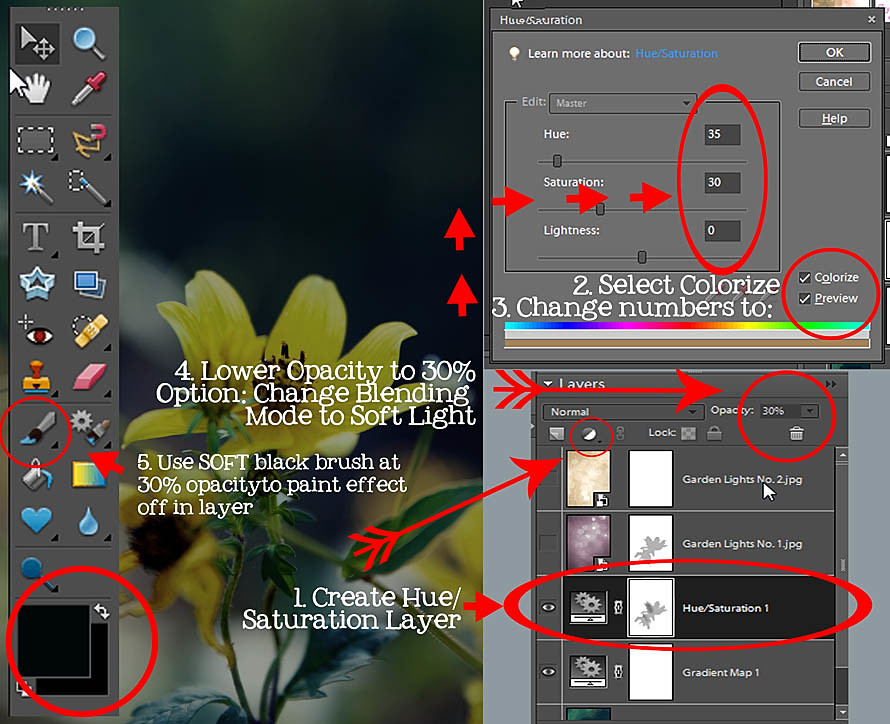
Step 2:
- Create Hue/Saturation layer (in your adjustment layers).
- Select Colorize.
- Change numbers to: Hue (35), Saturation (30), Lightness (0).
- Lower opacity to 30%.
- Use Soft BLACK brush at 30% (or less if you prefer) opacity to paint effect OFF in the layer.
- Optional: You can change the Hue/Saturation layer's blending mode to SOFT LIGHT for a slightly different look.
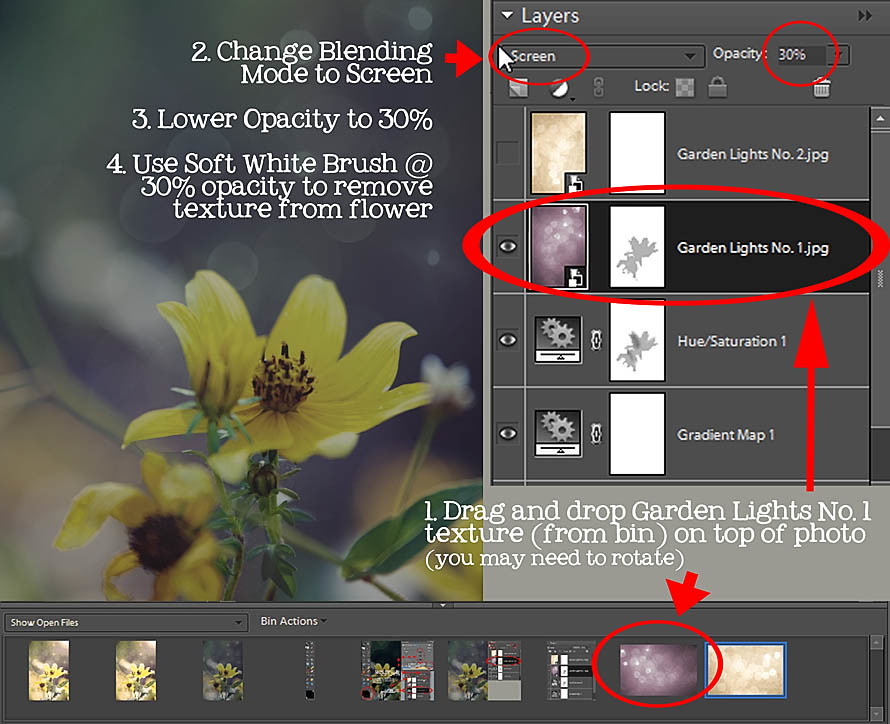
Step 3:
- Open Garden Lights 1 and Garden Lights 2 - they will be placed in the bin at the bottom of Photoshop Elements. Drag and drop Garden Lights 1 texture (from bin) on top of your photo. You may need to rotate it by going to the corner of the image and pulling right or left. There are other ways to apply textures, but this has always been the easiest way for me.
- Change the blending mode to SCREEN.
- Lower the opacity to 30%
- Use a soft BLACK brush at 30% (or less if you prefer) opacity to remove texture from the flower (or your subject). You will have to add a layer mask (in the previous steps, it was automatically given) - you can download a layer mask HERE.
Step 4:
- Drag and drop Garden Lights 2 texture (from bin) on top of your photo. You may need to rotate it by going to the corner of the image and pulling right or left.
- Change the blending mode to OVERLAY.
- Do NOT adjust the Opacity - leave at 100%.
- Merge layers (ctrl+shift+E)

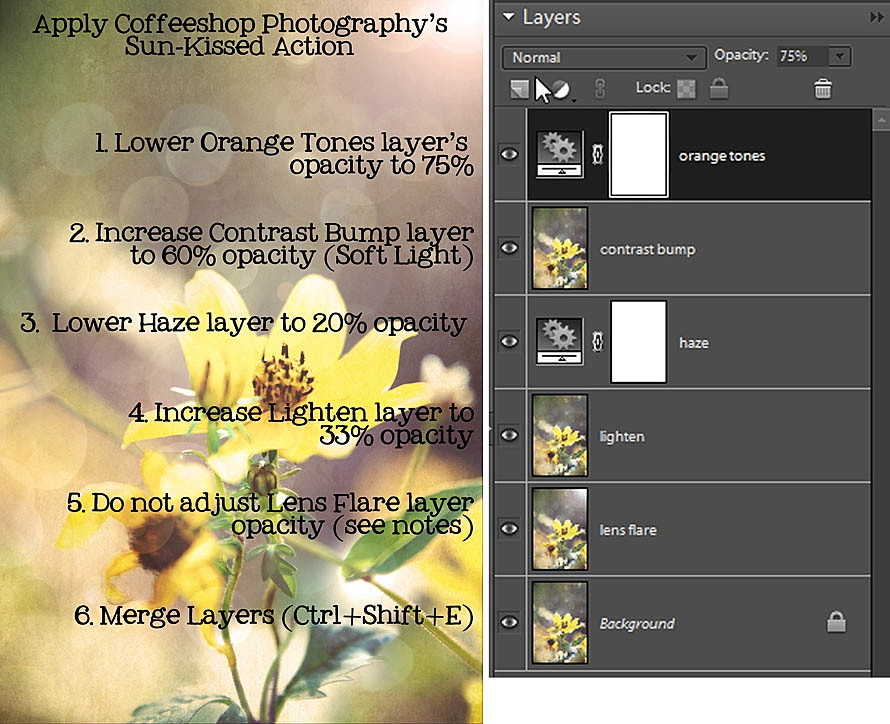
Step 5:
- Apply Coffeeshop Photography's Sun-Kissed Action. If you have a chance, read through Rita's quick steps...she makes things so easy! You can see the adjustments I made below, but you should adjust them to your preference.
- The one note that I'll make here is that when you're prompted to render a lens flare I typically use my default settings: 50-300 mm zoom at 159%. Unless it's over-powering, I won't adjust the opacity.
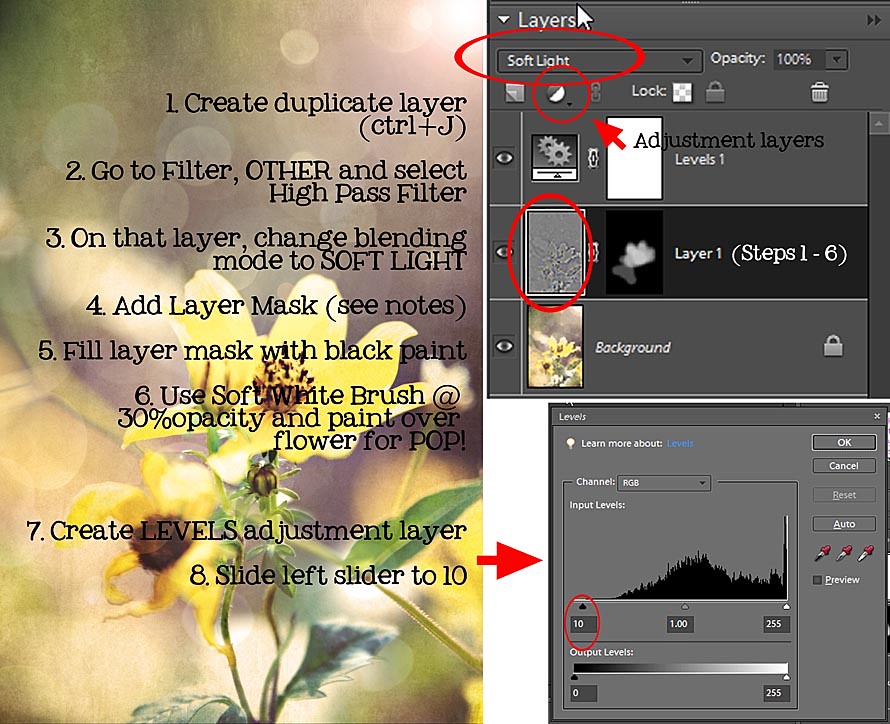
Step 6:
- Create a duplicate layer (ctrl+J)
- Go to Filter (in your top tool bar)>Other (at the very bottom of your drop down list) and select High Pass Filter. I think I have mine set up on 66 so I can lower the opacity later - feel free to experiment here.
- On that layer, change the blending mode to SOFT LIGHT.
- Add a layer mask (You will have to add a layer mask - you can download a layer mask HERE.)
- Fill the layer mask with BLACK paint (in this case, you'll be revealing the effect, not removing the effect).
- Use a Soft WHITE brush at 30% opacity and paint over the flower for an extra POP - this is my ALL TIME FAVORITE photo editing technique!
- Now, create a levels adjustment layer.
- Slide left slider to 10 (you can also add a vignette here, but I prefer this approach).
 Once you're done with that step, merge your layers and re-size and sharpen (if you're posting to the web). Here's the Before and After. What do you think?
What questions do you have? If you do try out this effect, we'd love to see your results!


Wow. Makes me a bit dizzy and glad I am using Gimp (And sad that I don't have PSE LOL) Great job!
ReplyDeleteAwesome! I just love this tutorial! Thanks for doing this and showing us! Awesomeness :-)
ReplyDeleteYeah I do not have photoshop either just paint or i use pixlr which is alittle like photoshop.
ReplyDeletebut pretty nonthe less. I will have to try my texture that i found and play alittle.
Very cool. Makes me want to save for PSE7. ;)
ReplyDeleteGreat tutorial, Ashley!! Beautiful photo, as well!
ReplyDeleteI can't wait to try it - thanks so much for this wonderful tutorial! Gosh, I sure wish I had your skills - both in photography and processing! :)
ReplyDeleteWonderful Tutorial! I just love it when people are willing to share their skills!!!!!!!!
ReplyDeleteWow! You are an amazing teacher. Great step by steps. :)
ReplyDeleteLooks beautiful! Thanks for sharing this VERY well written tutorial!
ReplyDeleteGreat tutorial. I really like your bokeh layers but was unable to download them - downloads seem to be prohibited?
ReplyDeleteDownloads should be working now - sorry about that!
ReplyDeleteI had so much fun using this tutorial for Georgia's Halloween photos! It made it pretty easy for someone who's still new to PSE to get some great end results.
ReplyDeleteWOW... Ashley! Thanks for sharing this effect, i'm definitely going to have to give it a go :)
ReplyDeleteWOW SO COOL!!! Thanks so much! I am SO going to try this!!
ReplyDeleteI gave the effect a try, here is the result:
ReplyDeletehttp://threeinthreebabiesg.blogspot.com/2010/10/friday-fun.html
Let me know what you think of my results!